User Field Definitions
Previous Topic  Next Topic 

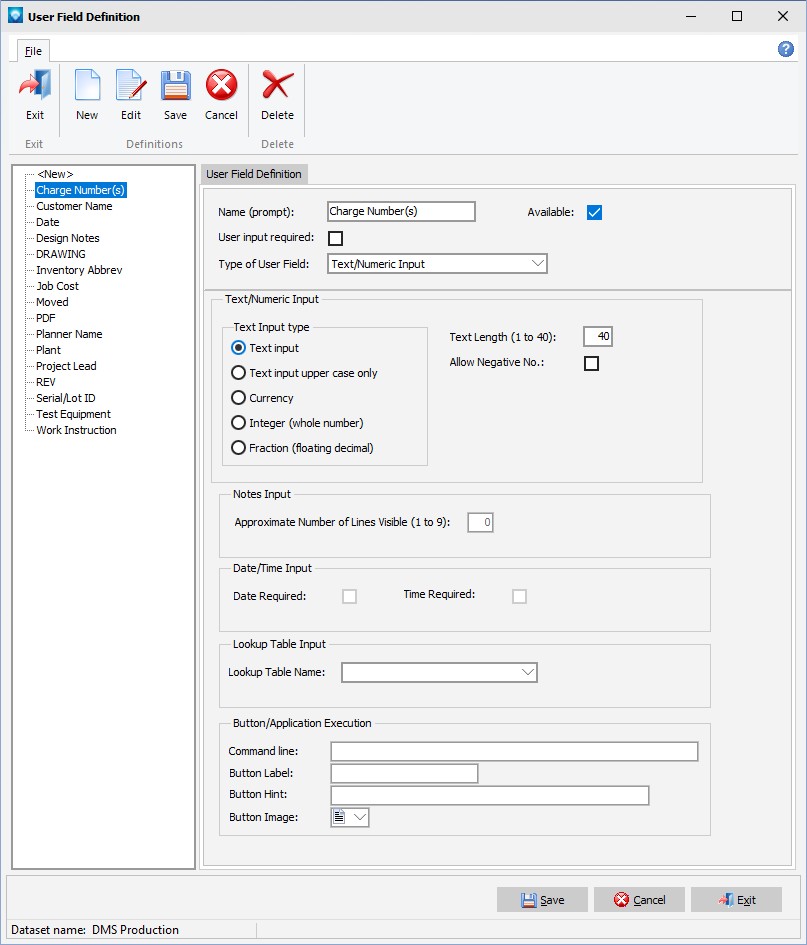
User Field Definitions is where you define each user field you would like to use.  You define the name of the user field and it attributes, such as the type of user field (Text, Notes, Date/time, etc.).  After you have defined a user field, you select where you want to use the user field and how it will appear on the screen using User Fields Required.


Once a user field has been defined and is used by DMS, it cannot be deleted unless all references to the user field using are assigned to another user field or all references are deleted.  Instead of deleting a user field you can make it unavailable for use by unselecting the Available check box.


When you select Tables | User Fields Setup | User Fields Definitions, the following windows appears listing the current user fields:


The following tabs and commands are available:


File


  1. New To add a user field, select File | New or click on the new icon .
  2. Edit To edit an existing user field, highlight the user field in the grid and select File | Edit or click on the edit icon .
  3. Delete  To delete an existing user field, highlight the user field in the grid and select File | Delete or click on the delete icon .  DMS will confirm the delete.  Click OK to delete the user field, or click Cancel to cancel the delete.


The following explains the prompts:


  1. Name (prompt)  Enter a unique user field name.  The name entered becomes the prompt that appears on the screen for the user field.  Up to 20 alphanumeric characters can be entered for the name.
  2. User input required  Select the User input required check box if the user must make an entry to the user field.  that is, the user field cannot be left blank.  Leave this check box unselected if the entry to this user field can be left blank.
  3. Type of User Field The type of user field can be one of the following:
    1. Text/Numerical Input
    2. Notes input
    3. Date/Time input
    4. Lookup table input
    5. Button Application Execution that will execute a Windows command for a given file. 
  4. If Text/Numerical input was selected:
    1. Select one of the following:
      1. Text input for up to 40 alphanumeric characters
      2. Text input upper case only text input up to 40 alphanumeric characters that will be converted to upper case
      3. Currency
      4. Integer (whole number)
      5. Fraction (floating decimal)
    2. Text Length (1 to 40)  Enter the maximum length of the input allowed from 1 to 40.
    3. Allow Negative No.  Select this check box if you are using numerical input and negative number are allowed.  If numerical input and only positive numbers and 0 are allowed, do not select this check box.
  5. If Notes input was selected:
    1. Approximate Number of Lines Visible (1 to 9)  Notes input appears as a box on the screen.  Select how many lines of notes input you want to appear on the screen.  The selection entered is approximate as the font size and screen layout may limit the number of lines to display.
  6. If Lookup table input was selected:
    1. Table Lookup Name  Enter the previously defined table lookup name (defined by User Field Lookup Names) that will be used for the this user field.
  7. If Button/Application Execution was selected:
    1. Command line  The command line is the folder location and application name of the application you want to execute when the button is pressed in DMS.  For example, to execute Microsoft word, the command line might be "C:\Program Files\Microsoft Office\OFFICE11\WinWord.EXE".  The command line must be available for all networked users who are using DMS.  The command line may be left blank as long as the filename that will be entered into the user field uses a valid Windows extension.  Note that the file that is being opened by the button command must already exit and be accessible for all users using DMS.  If the filename does not exist pressing on the button in DMS to open the file will not do anything.
    2. Button Label  The button label is the text that will appear on the button on the screen.  Enter up to 10 alphanumeric characters for the button label. 
    3. Button Hint  The button hint is text that appears when the mouse hovers over the button on the DMS screen.  Up to 60 alphanumeric characters can be entered for the button hint.  For example, the button hint may say "Open Word  drawing" is the button accesses a Drawing file and application.
    4. Button Image  Each button defined can have a user selected image.  Images are selected from the drop down menu.  Valid images to select are:


      and are two examples of user field buttons with icons.

  8. Click the Save button to save the entry.  Click Cancel to ignore the entry.


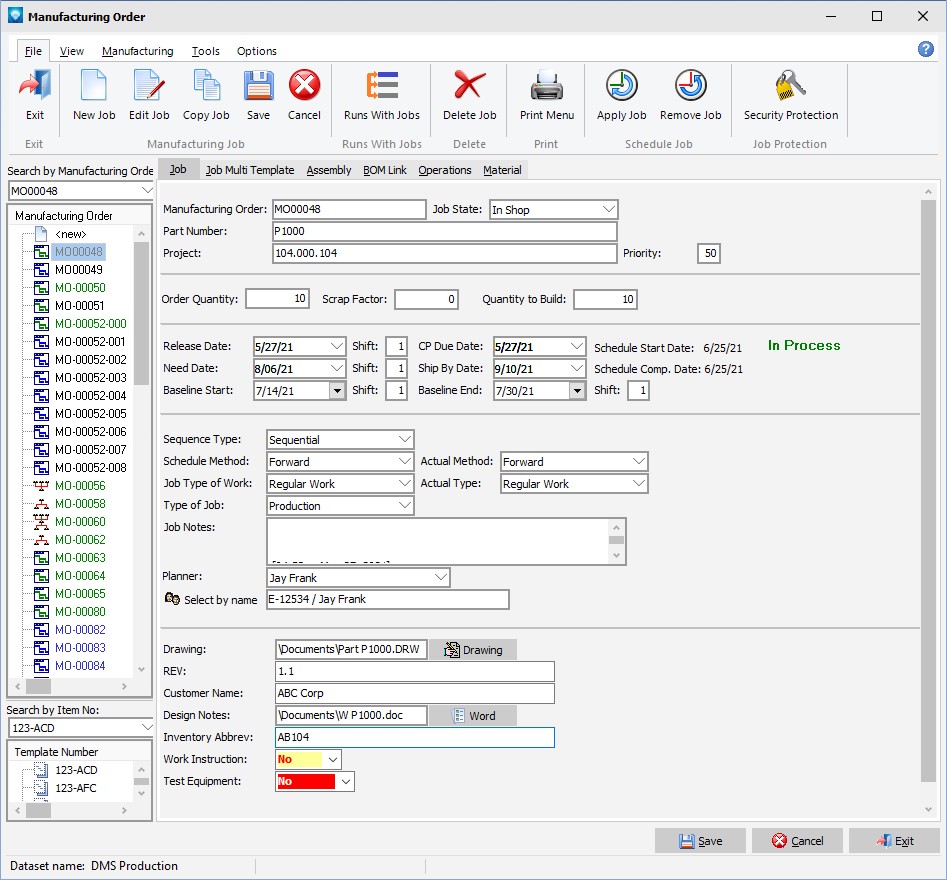
The example screen below shows a job with seven user fields.  There are two use fields with buttons; Drawing and Design Notes.  Clicking on the button will open the file corresponding.  Note that the file location has the folder as well as the filename in the user field prompt.  Two other lookup user fields are present; Work Instruction and Test Equipment.  These lookup user fields have colors selected by the user where the foreground and background show in different colors depending on the lookup item selected: