Email Reports
Previous Topic  Next Topic 

DMS Reports can be emailed and can also be run as an auto execution command (i.e. from a command/batch file).  In order for a DMS report to be run as an auto execution command the report must be set up in Email Reports.  A report can also be emailed directly from the View Report window.


To set up reports to be emailed by the auto execution command or to set up standard reports that will be emailed manually on a regular basis, select the Email Reports button in Mfg Orders Job Grid.  The following window appears:


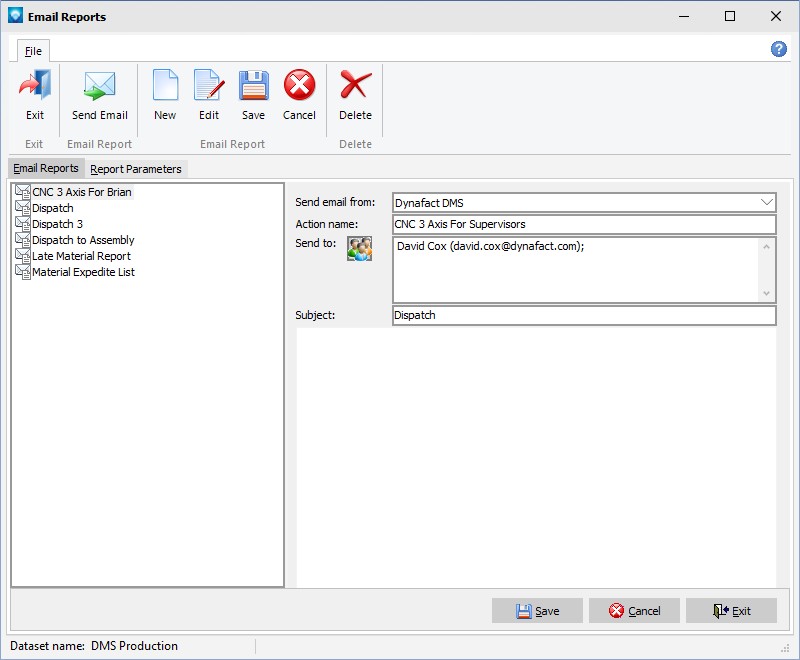
If there are existing Email Reports, they are listed in the list box at the left side of the window.  In the above example, there are not any Email Reports.


To add a new email report:


  1. Select File | New or click on the new icon.
  2. Send email from Select the email address you want to send the email from. 
  3. Action name Enter the name of the email report.  The action name is used when you want to email report using Auto Execution (ie. AutoReport=Action Name).
  4. Send to Click on the button or double click in the Send to list to select who you want to send the report to.  The Send to email window appears.
  5. Subject Enter the email subject for the schedule report.
  6. You can add information to the body of the email as required.
  7. Click Save to save the email report settings.  Click Cancel to cancel all the changes.


Once you have set up the Email Reports tab, you need to set up the report parameters:

  1. Click on the Report Parameters tab.
  2. The following window will appear.  The example below shows the Report Parameters tab with data entered:

  3. Action name The Action name displays the name of the Email Report.  It cannot be edited on this tab.
  4. Report category Select the report category where the DMS report is located.
  5. Report name Select the report name.  The report must already exist.  Note:  Depending on the type of report selected, the start and end date range, sort and other prompts will change from the example above.
  6. Search Selection If a Mfg Orders Job Grid search will be used for the email report, select the search selection.  The search selection must already exist.
  7. Report date to use Select either Schedule Start Date for the report to use the schedule start date or select Use date report is executed (i.e. Today) to use the date the report is run as the start date.
  8. Resource Selections Enter any resource selections for the report.
  9. Job start plus days from/to Enter the number of days “from” and “to” in order to date bind the report start date based on the selection made in step 7.  From example, if you chose Schedule Start Date and you entered from 0 to 10, the report will select jobs that start from the schedule start date plus 0 days to the schedule start date plus 10 days.
  10. Job end plus days from/to Enter the number of days “from” and “to” in order to date bind the report end date based on the selection made in step 7.  From example, if you chose Schedule Start Date and you entered from 10 to 15, the report will select jobs that end from the schedule start date plus 10 days to the schedule start date plus 15 days.
  11. Sort report by Select the type of sort for the report.  The type of sorts available depends on the type of report selected in step 5.
  12. Click Save to save the report settings or click Cancel to ignore the entries.


Once you have saved an Email Report, the report can be emailed using the Send email button and it can be sent using the auto execute command AutoReport. 


To send a report, select the report from the list box and press the Send button on the Email Reports tab.  A window appears verifying you want to send the email report.  Click Yes to send the email report or click No to not send the email report.