Job Selections enables you to select jobs based on the job header information. To access job selections, click on Selections | Job Selections. Note that if you have made selections the button will toggle to the On position.
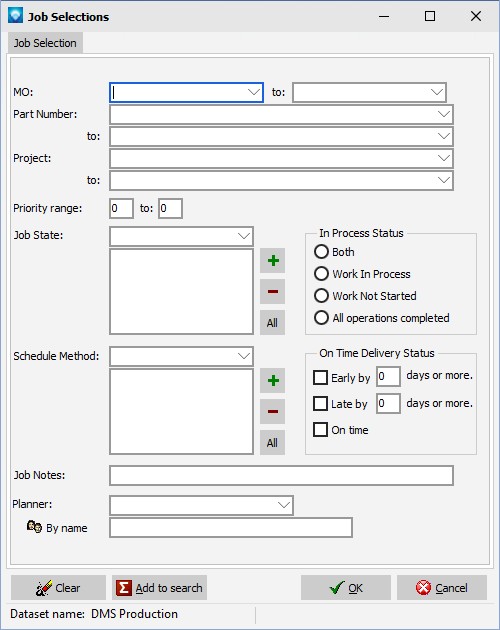
After clicking on the Job Selections button, the following window will appear:
If you have previously made selection from this window and you have not cleared the selections using the Clear Selections button, then the previous selections will be displayed in the window.
Job Selections has a cumulative search where multiple selection criteria can be made.
The following entries can be made:
- Order Number You can enter the starting and ending order number for the search. Existing order numbers can be seen by using the drop down menu on the prompts. You can enter an order number into just the first field if you do not want to search on a range of order numbers. Wildcards can be used.
- Part Number You can enter the starting and ending part number for the search. Existing part numbers can be seen by using the drop down menu on the prompts. You can enter a part number into just the first field if you do not want to search on a range of part numbers. Wildcards can be used.
- Job Identification You can enter the starting and ending job identification for the search. Existing job identifications can be seen by using the drop down menu on the prompts. You can enter a job identification into just the first field if you do not want to search on a range of job identifications. Wildcards can be used.
- Priority Range A priority range can be entered from 1 to 99. If blank or 0 is entered, the priority range is ignored. Only those jobs that fall in the given priority range will be selected. You can enter a priority into just the first field if you do not want to search on a priority range.
- Job State One or more job states can be entered for the search. To select a job state, use the drop down menu and select the state. To add the selected state to the search, click on the
 icon to add the job state to the search list box. The selected job state will then appear in the job state list box below the drop down menu. You can remove a job state from the search by highlighting the job state to remove in the list box and clicking on the
  icon or by double clicking on the job state to remove. DMS will verify that you want to remove the job state from the search. Click OK to remove it, or Cancel to leave the job state in the search. You can also select all jobs states by clicking on the All button next to the job states list box. All the job states will added to the list box.
- Schedule Method One or more schedule methods can be entered for the search. To select a schedule method, use the drop down menu and select the schedule method you want to search for. To add the selected schedule method to the search, click on the icon to add the schedule method to the search list box. The select schedule method will then appear in the schedule method list box below the drop down menu. You can remove a schedule method from the search by highlighting the schedule method to remove in the list box and clicking on the icon or by double clicking on the schedule method to remove. DMS will verify that you want to remove the schedule method from the search. Click OK to remove it, or Cancel to leave the schedule method in the search. You can also select all schedule methods by clicking on the All button next to the schedule method list box. All the schedule methods will added to the list box.
- In Process Status The in process status selects either both in process and not in process (the default), work in process, or work not in process. Click on the selection you want.
- On Time Delivery Status You can search for jobs that are early by a given number of days or more, late by a given number of days or more, or jobs that are on time. Select the category you want and then optionally enter the number of days early or late you want to search on.
- Job Notes You can enter a search string to locate in the job notes. Typically you want to use wildcards in the search otherwise DMS will look for an exact match.
- Planner If you are using the Planner, you can search via a planner's name or employee number to select all jobs with that have the selected planner.
- Click OK to accept the search criteria or click Cancel to restore the search criteria to the state it was when you entered into Job Selections.
In order for the search to be applied you must click on the Search button. (Other reports and graph search selections take place immediately or when the graph/report is displayed.)
If you click on the Clear button, all job selections will be cleared.
Cumulative Search
Each time entries are made to the Job Selections and the  button located at the bottom left side of the window is pressed, the search criteria is added to the existing search and the search prompts are blanked out so new entries can be made. This method enables you to perform searches such as different ranges of jobs, different ranges of jobs with different selection criteria, etc.
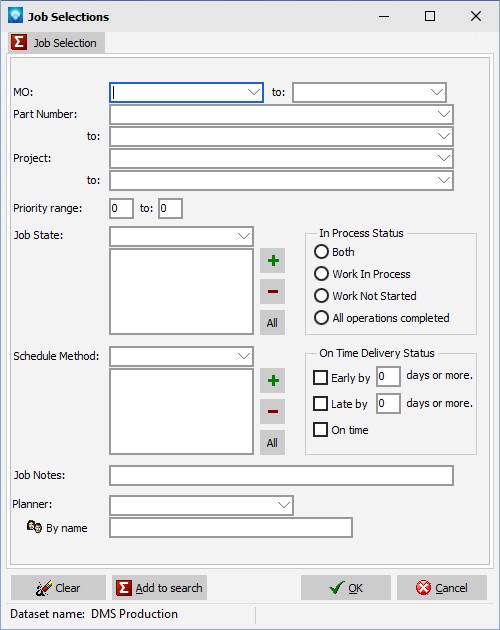
After Job Selections have been made and the user presses the button, the search is added to the current search and the cumulative search image appears on the tab to show you that you have added the search criteria to the existing search. The example below shows that search criteria has been added to the existing search by the  appearing on the Job Selections tab:
When you press OK, the search request is prepared and the Job Selections window closes. If you enter back into Job Selections during the same session, the Job Selections window will show the last entered search criteria. You can press the button to clear the last entered search and make new entries, or leave the criteria as is and add to the existing entries.
If you press the OK button without the cumulative search icon displayed, the search criteria last entered is the only search that will be made. Any previous cumulative searches are lost.

