|
Report on Job Updating Tutorial
|   |
|
Report on Job Updating Tutorial
| |
In this tutorial we are going to create a new report based on the DMS Report Type Job Updating Transactions.
In Mfg Orders Job Grid, click on the New Report button. DMS will display the New Report window. Enter the information as per the example below (you can use the default Report filename):

Click Save and the Report Designer will appear as in the example below:

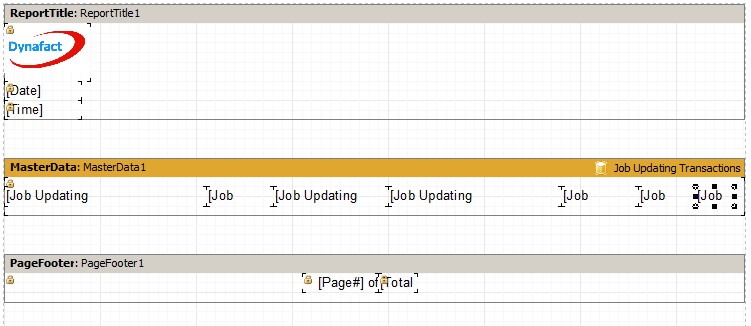
Add a text object from the Designer Menu Bar to the Master Data Band so that we can color alternate lines. Leave the text blank and align the text object to the Master Data Band by changing the Align property to "baClient" as in the example below:

With the text object you just added selected, click the Highlight Editor using the icon ![]() The Highlight Editor will appear. Click the Add button and the Expression Editor appears. Replace the current Value < 0 expression with <line> mod 2 = 1. What this says is if the line number divided by 2 has a remainder of 1, the expression is true. Therefore, every other line will be true. The Expression Editor will appear as:
The Highlight Editor will appear. Click the Add button and the Expression Editor appears. Replace the current Value < 0 expression with <line> mod 2 = 1. What this says is if the line number divided by 2 has a remainder of 1, the expression is true. Therefore, every other line will be true. The Expression Editor will appear as:

Click OK to save the expression. In the Highlight Editor click on the Fill button so that we can select a fill color for the line. On the Brush tab, select a background color similar to the example below:

Click OK to save the background fill color. In the Highlight Editor, uncheck the Font selection. the editor will appear as:

Click OK to save the highlighting for the line.
Save your work up to this point by using the File | Save or the save icon ![]() .
.
Place the following data fields on the text object on the Master Data Band:
The work area will appear similar to the example below:
Add a Page Header Band from the Designer Menu Bar. The Page Header Band will automatically appear before the Master Data Band. In the next step we will add background color to the Page Header Band. To do this, select the Page Header Band and in Properties select the Fill property. The Fill Editor will appear. Click on the Gradient tab and select a start and end color similar to the example below:

Click OK to save the fill color.
Add the following objects to the Page Header Band:
Save the report.
The report work area will appear similar to the example below:

As a last step, we are going to add a report title. Add a text object to the Report Title Band at the top of the report. Add the text "New Job Updating Report" as in the example below:

Click OK to save the text.
Change the cursor back to a pointer by clicking on ![]() on the Designer Menu Bar. Select the text object you just added and change the font at the top of the designer to 14. Center the text in the ext object by using the icon
on the Designer Menu Bar. Select the text object you just added and change the font at the top of the designer to 14. Center the text in the ext object by using the icon ![]() . Vertically align the text object using the icon
. Vertically align the text object using the icon ![]() at the top of the designer and then horizontally align the text object by using the icon
at the top of the designer and then horizontally align the text object by using the icon ![]() .
.
The report work area will appear similar to:

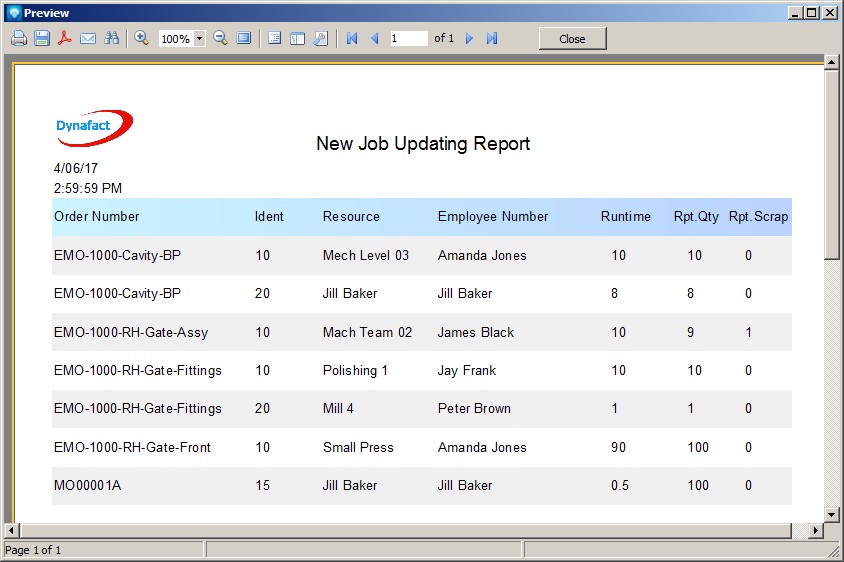
Save the report. Exit the report designer and try viewing your new report. It should appear similar to: