|
Job Status Grid Selections
|   |
|
Job Status Grid Selections
| |
Job Status Grid Selections enables you to select what fields you would like to see in the Job Status Transaction Display grid.
If you are displaying notes in the grid, you have the option of displaying all the lines of the notes instead of just one line. To display multiple notes lines, select View | Show Notes Lines set a check mark on the selection in the menu. If the menu item is already checked, selecting View | Show Notes Lines will uncheck the option.
To access Job Status Grid Selections, select View | Job Status Grid Selections from the Job Status Transaction Display screen.
The following screen appears:
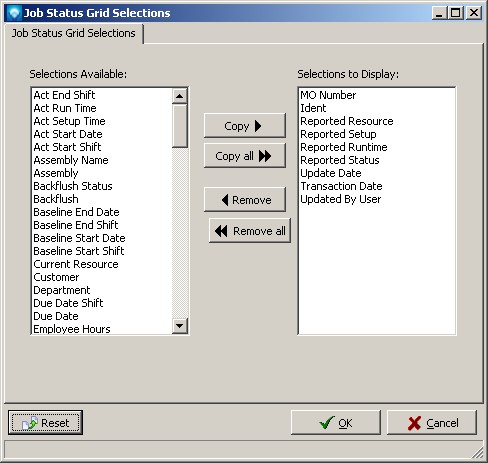
The left list box Selection Available lists the fields that are available but currently not displayed in the grid. The right list box Selections to Display lists the fields that are currently displayed.
If you click on the Reset button, the Selections to Display will be set to the default system settings. The example above shows the default system settings.
The Selections to Display orders the columns of the grid. That is, the first item in the list box is column 1 of the grid, the second item is column 2, and so on. You can reorder the Selections to Display by dragging and dropping the fields in the Selections to Display list box in the order you want the fields to be displayed in the grid.
You can drag and drop fields to/from each list box or use the buttons to make your selections.
Once you have made your selections, click OK to save and exit or click Cancel to ignore the changes and exit.
Note that if you click OK, the new fields are displayed in the grid and the grid column widths change to the default setting. You can resize the grid columns by positioning the mouse over the separator bar between the columns in the heading.
You have the option of displaying and using a "search footer" at the bottom of the grid by selecting View | Search Footer. The search footer will search for the text you have entered for all displayed columns in the job grid. The search text can be dates, text, numbers, etc. The search footer is displayed only for the current session; when you close and re-enter Job Status Transaction Display again the search footer will not be displayed.
When you enter text the Find Next and Find Previous buttons are activated enabling you to look forwards or backward through the grid. In the example below the search text "WH-LOCAL" was entered:
![]()
If you enter text that does not exist in the grid, the text has a red background to let you know right away that a match does not exist. The example below shows the appearance of the search footer when a match does not exist:
![]()
If you are displaying a lot of data, the search may take several minutes. To close the search footer, click on the ![]() button on the search footer.
button on the search footer.