Calendar/Capacity Changes
Previous Topic  Next Topic 

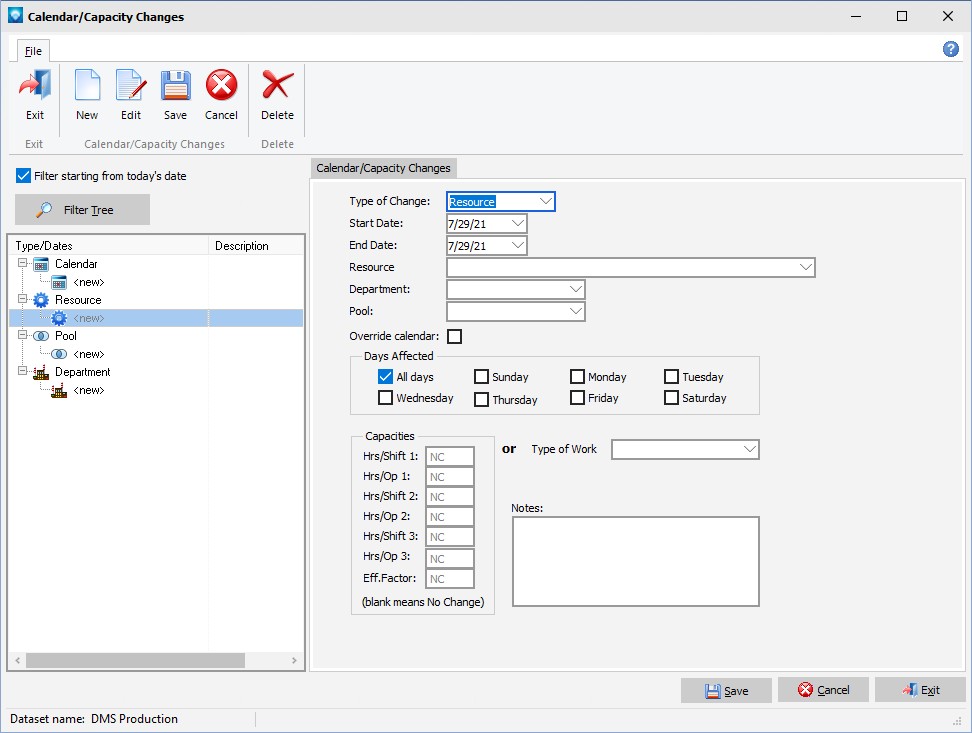
Calendar/Capacity Changes are changes you want to make to the manufacturing calendar such as holidays, planned overtime, planned shut downs, etc.  These changes can optionally be displayed on the monthly Calendar Menu (see Calendar & Planner Options).


To access Calendar/Capacity Changes, select Manufacturing | Calendar/Capacity Changes.  You can also add a capacity change by right clicking on the monthly Calendar Menu and selecting New Capacity Change from the popup menu.


The following screen will appear:


There are four types of calendar changes you can make.  They are:


  1. Calendar which affects the entire shop.  These types of changes are typically holidays.
  2. Department is a change that affects all resources in a given department.
  3. Pool is a change that affects all resources in a given pool.
  4. Resource is a change that affects the given resource.


You can navigate through the calendar/capacity changes by using the tree.  The tree is ordered by the type of calendar/capacity change and then sorted by start date within the type.


Calendar Type of Change

To perform a Calendar type of change perform the following steps:


  1. Select File | New, click on the new icon, or click on <new> button under the Calendar prompt on the tree to create a new calendar capacity change.
  2. Type of Change  Enter Calendar as the type of change you want to make.
  3. Start Date  Enter the start date of the calendar change.
  4. End Date  Enter the end date of the calendar change.
  5. Days Affected  The default for days affect is all days between the start and end date.  You can select all day or individual days of the week as required.
  6. Shifts or Type of Work Enter the shifts that are affected by the capacity by selecting each shift or enter the type of work to apply for the selected time period.
  7. Notes You can optionally enter a description of the calendar change as required.
  8. Click OK to add the calendar change.


Resource, Pool and Department Type of Changes

To perform a Resource, Pool or Department type of change perform the following steps:


  1. Select File | New, click on the new icon, or click on <new> button under the Resource prompt on the tree to create a new Resource capacity change, click on <new> button under the Pool prompt on the tree to create a new Pool capacity change, or click on <new> button under the Department prompt on the tree to create a new Department capacity change.
  2. Type of Change  Enter either Resource, Pool, or Department as the type of change you want to make.  After entering one of the three types of changes and you leave the Type of Change prompt, the Shifts group box in the lower left side of the screen changes to show the capacities as in the example below where a Resource change was entered:

  3. Start Date  Enter the start date of the change.
  4. End Date  Enter the end date of the change.
  5. Either the Resource, Pool, or Department prompt will be next depending on the type of change entered.  Enter the resource, pool, or department that the change will be applied to.
  6. Override Calendar  If Override Calendar is checked, the change will override any Calendar type changes that may occur in the same date range.  Select where or not you want this change to override any Calendar changes.
  7. Days Affected  The default for days affect is all days between the start and end date.  You can select all day or individual days of the week as required.
  8. Capacities or Type of Work Enter the capacity changes by entering a new value for the Hours/Shift and Hours/Operation for each of the shifts or enter the type of work to apply for the selected time period.  A blank entry to either Hours/Shift or Hours/Operation will display a "NC" for "no change" for the given shift.
  9. Notes You can optionally enter a description of the change as required.
  10. Click OK to add the calendar change.


Filter Tree

You can select calendar/capacity changes starting from today's date by checking the prompt "Filter starting from today's date" located above the tree.  After you check this selection and press either the Enter or Tab key, the tree will display all calendar/capacity changes starting from today's date forward.


You can use the Filter Tree button to select the calendar/capacity changes.  If you click on the Filter Tree button the following window appears enabling you to enter the filter criteria:


Enter the criteria and press OK to display the subset of calendar changes.  The selected calendar/capacity changes are displayed in the tree.