|
Copy Dataset
|   |
|
Copy Dataset
| |
The copy dataset command enables you to copy an existing dataset to another existing dataset. The dataset to copy and the dataset to copy over must both exist on the same SQL Server. The dataset that is going to be copied over will have all its existing data overwritten by the copy.
Before you can overwrite a dataset, the dataset must allow a copy to take place. To allow a copy to overwrite the data in a dataset, the Edit command in Organize Datasets is used to flag the dataset as "Allow copy to overwrite dataset". The current dataset that you are logged onto is the dataset to copy. Note that if during a copy the copy fails because of SQL permissions or another problem, the "Allow copy to overwrite dataset" may be set to false. You may then need to use Organize Datasets to reset the "Allow copy to overwrite dataset" as required.
In order to copy a dataset, DMS uses the SQL Server backup and restore methods. This means that a SQL user name and password assigned by your IT group must be setup using the DMSSetup.EXE utility. (For technical information on the DMSSetup.EXE and the database copy, see below the Technical Information below.)
DMS performs the following steps:
Use Master
alter database DBToCopyOver set SINGLE_USER with ROLLBACK IMMEDIATE
alter database DBToCopyOver set MULTI_USER
Since the backup and restore may take several minutes to perform, DMS runs these commands in background. Therefore, while the copy is taking place, you can perform other tasks in DMS with the exception of logging out of DMS and changing datasets. While the copy is taking place, you should not close the Copy Dataset window or else the copy will fail and the resulting data copied to the dataset may be corrupt.
To copy a dataset, from the main calendar menu select Database | Copy datasets. The following windows appears letting you know the current dataset name and the underlying database name. In the example below the dataset currently logged into is named is DMS Production and the database name is DMS:
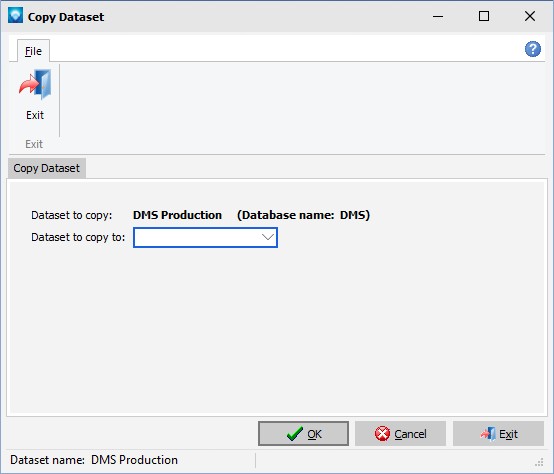
To perform a copy:

If the dataset you are copying over does not have the select "Allow copy to overwrite dataset" checked in Organize Datasets, the following exception occurs:
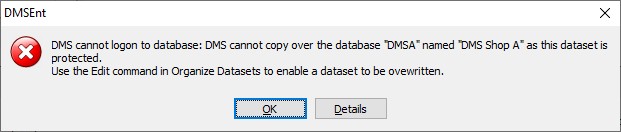
To enable the copy over a dataset, make sure that the dataset has the "Allow copy to overwrite dataset" selected.
The backup file is created in the \DMS\Export file unless otherwise specified in the user’s DMSUser.INI file. To specify a different location, add the following parameters to the user’s DMSUser.INI file:
[Backup]
BackupFolder=C:\some folder\Backup\
Where C:\some folder\Backup\ is the folder location where you want the temporary backup file written.
SQL may block a backup file written to certain locations including network locations. Therefore, a local drive may need to be specified for the backup folder.
It may be best to write the backup file to a folder in the SQL Server area where it is protected and leave the backup file by selecting “Do not delete backup file” in DMSSetup.EXE. Since disk space is inexpensive, it is recommended that you do not delete the backup file created by the copy.
The backup command used by the DMS copy uses the parameter COPY_ONLY so that backup does not interfere with regular scheduled backups. INIT is also used for the backup so that existing backup files used by the copy are overwritten.
If you choose to write the backup file to a SQL server location, Windows may not be able to delete the file as it does not have access to the SQL Server. You can instruct DMS to use SQL commands to delete the file, but you must perform the following:
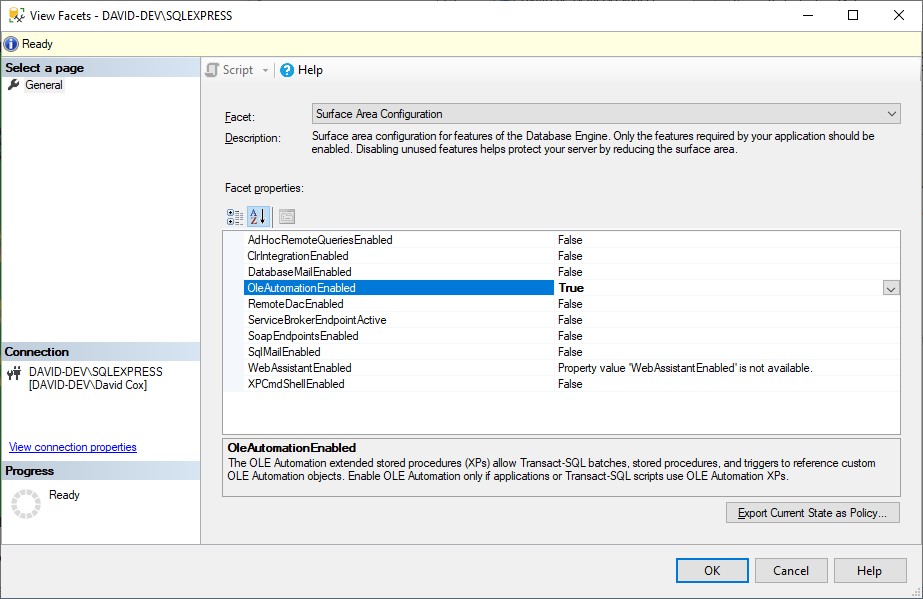
exec sp_configure 'Ole Automation Procedures', 1
go
reconfigure
go
If you are using a SQL user name for the database copy, the SQL user should have db_owner permission or the following permissions: