External Database Display SQL Scripts |
|
After defining a connection string to the external database, the SQL required for the display needs to be defined. This includes the Data Dictionary (columns) you want to display in DMS as well as optional Comparison Information to display certain columns in selected colors if the comparison is true.
To define the SQL script, from the DMS Monthly Calendar Menu select Database | Database Display | External Database Display SQL Scripts. The following screen appears:
The following tabs and commands are:
File
1.New Select File | New to add a new SQL script.
2.Edit Select File | Edit to edit the currently highlighted SQL script in the tree, or double click on the SQL script name in the job tree to edit the script.
3.Delete Select File | Delete to delete the currently highlighted SQL script in the tree. DMS will verify the SQL Script you want to delete. Click Yes to delete the SQL script or No to ignore the delete.
There are three tabs to define an External Database Display SQL Script. They are:
1.External Database Display Header
Each of these tabs are explained below.
External Database Display Header
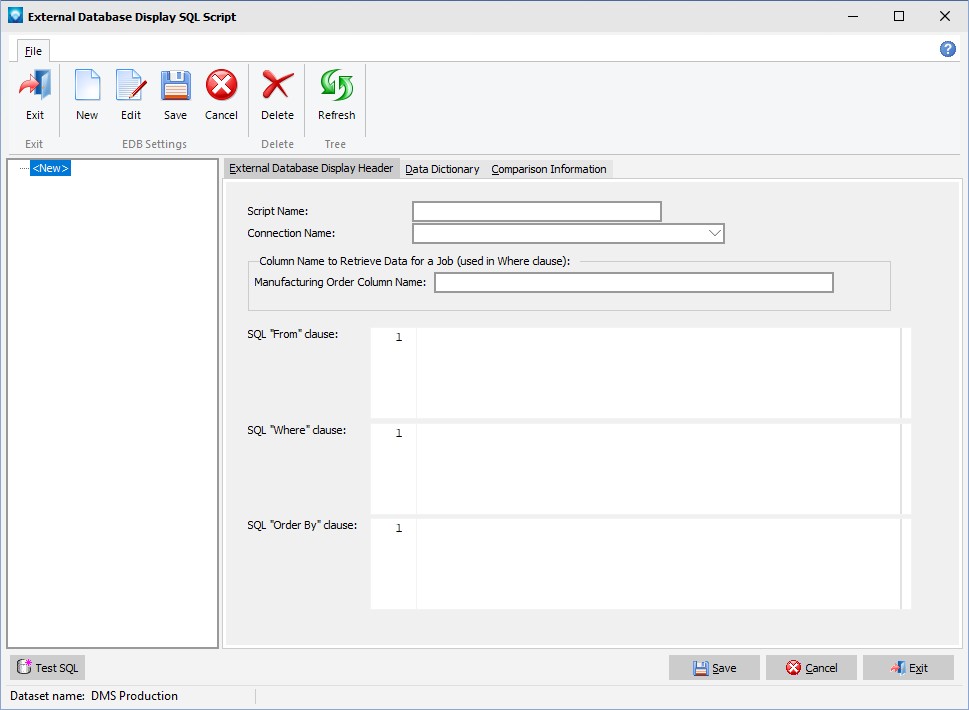
To define the External Database Display header, enter:
1.Script Name The name must be unique and is used to identify the interface to the external database.
2.Connection Name The connection string name that you have previously defined to connect to the database.
3.Order Number Column Name This is the Order Number or MO column name in the external database that you are connecting to. It is used by DMS to identify what information to display for a given job.
4.SQL “From” clause Enter the SQL From clause that defines what external tables/views you are extracting the information from.
5.SQL “Where” clause Enter the Where clause (if required) for the SQL script.
6.SQL “Order By” clause Enter the Order By clause (if required) for the SQL script.
7.Once the header information has been entered, click the Save button to save the header information. Click the Cancel button to ignore the changes.
8.After you have saved the header, you can press the Test SQL button to test the information you have entered and verify that it is correct.
The example below shows the header screen with data entered:

After the External Database Display header has been defined and saved, you enter the data dictionary (columns) of information. The columns entered to define the data dictionary are the columns you want the user to have the option to display. The screen example below shows the Data Dictionary tab:
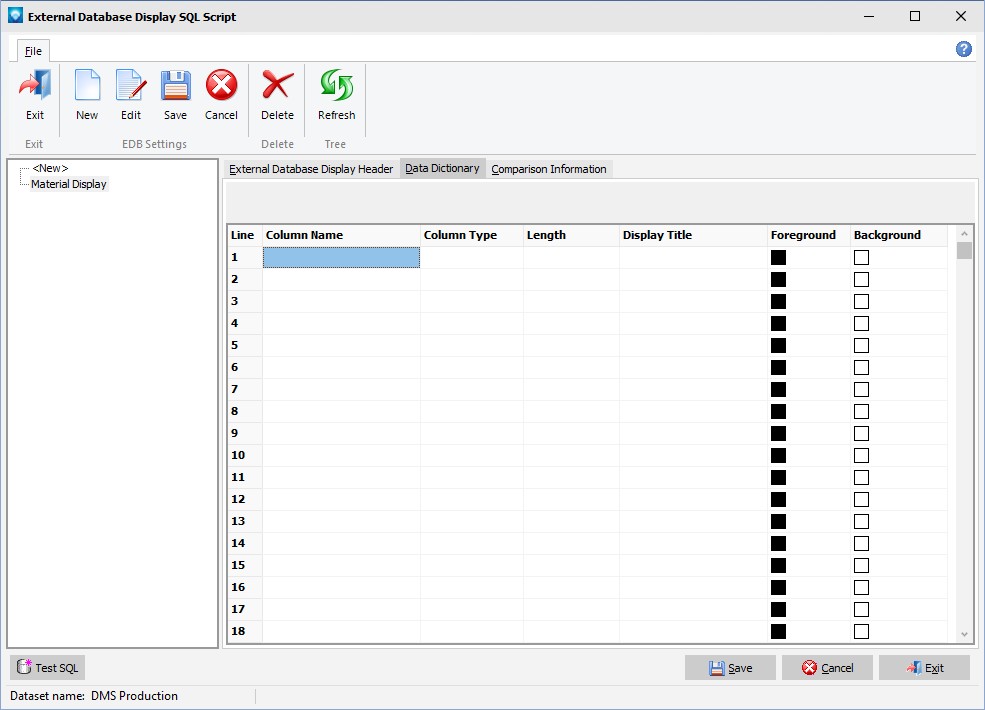
To define the Data Dictionary, enter the following:
1.Column Name Enter the column name of the data defined in the external table or view.
2.Column Type Enter the column type. Valid column types are String, Integer, Boolean, Float, Currency, BCD, DateTime, Memo, LargeInt, or Variant.
3.Length If a String column type was entered, DMS will prompt you for the length of the string.
4.Display Title The Display Title is the title that will appear on the grid for this column when it is displayed in DMS.
5.Foreground Color You can select a foreground color for this column’s data when it is displayed in DMS. The default is black.
6.Background Color You can select a background color for this column’s data when it is displayed in DMS. The default is white.
7.Repeat steps 1 through 6 until all the external database columns you want to display in DMS have been entered.
8.Once all the columns have been entered, click the Save button to save the Data Dictionary information. Click Cancel to ignore the entries made.
9.After you have saved the Data Dictionary, you can press the Test SQL button to test the information you have entered and verify that it is correct.
The example below shows the Data Dictionary screen with data entered. In this example, five columns of information have been defined. Two of the columns (with the display names of Work Center and Job Due Date) have different foreground and background colors other than black on white:

After the header and Data Dictionary have been defined, you can optionally add comparison information that will display columns in a different color if the statement is true. This step enables you to flag certain columns of information if a certain condition exists. Note that if the Comparison Information is true, the Comparison Information colors will override the data dictionary colors. Currently, one Comparison Information per external database display can be defined.
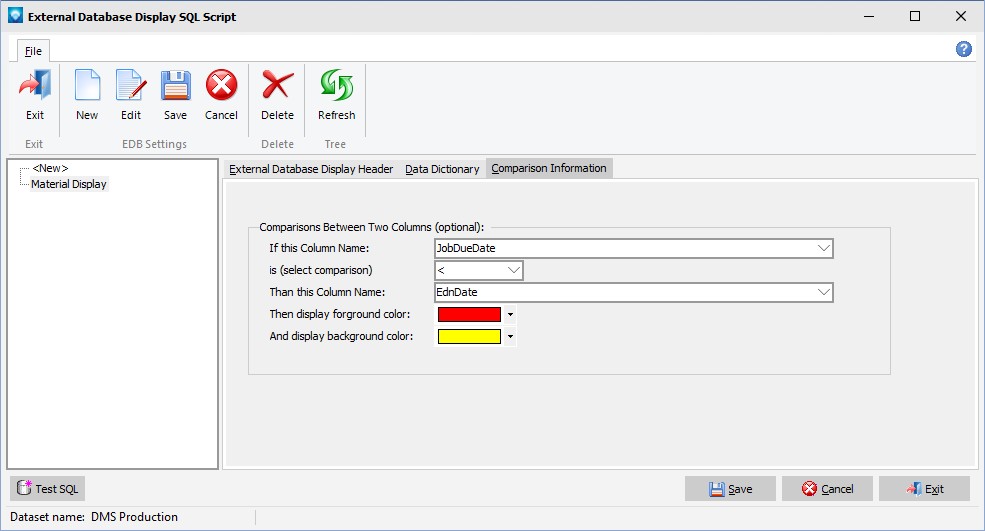
The screen example below shows the Comparison Information tab:

To define the Comparison Information, enter the following:
1.If this Column Name Enter the first column name you want to compare. The column name must be in the Data Dictionary.
2.Is (select comparison) Enter the selection comparison of either <, <=, =, =>, or >.
3.Than this Column Name Enter the second column name you want to compare the first column name to. The column name must be in the Data Dictionary.
4.Then display foreground color Enter the foreground color to display the column in if the statement is true.
5.And display background color Enter the background color to display the column in if the statement is true.
6.Press the Save button to save the Comparison Information. Press Cancel to ignore the input.
7.To test the Comparison Information, press the Test SQL button.
The example screen below shows the Comparison Information with data. In this example, if the column name JobDueDate is less than (<) the column name EndDate, it will display the two columns with a red foreground and a yellow background