A resource profile is the work capacity of a given resource based on the Type of Work. That is, it tells the DMS scheduler what work a resource can do for a given shift, day and week. A resource can have zero or more resource profiles, but should have at least one resource profile or it cannot be used by the scheduler.
Resources can have variable work weeks that enables you to set up different work weeks for resources. For example, you may have 2 work weeks where week one is a 5 day work week from Monday to Friday, and week two is a four day work week from Monday to Thursday. Resource Options & User Fields is used to set up to 4 resource variable work weeks. Depending on the number of weeks selected in Resource Options & User Fields, one or more weeks can be defined for each resource profile.
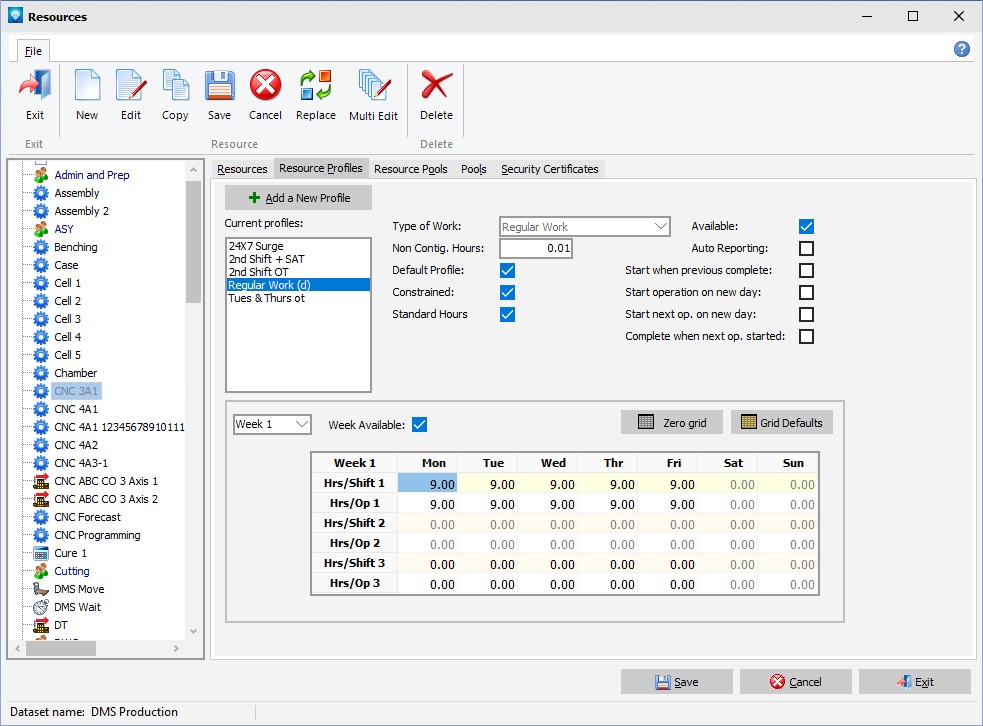
The screen example below shows a resource profile for the type of work "Regular Work" for the CNC 3A1 resource. Note that in the "Current profiles:" list the "Regular Work" has a "(d)" next to its name. This informs you that the "Regular Work" profile is the default profile for this resource. The default profile is the profile that is used by the scheduler if you do not specify which type of work to use at either the job, operation, or schedule level. The work week displayed is "Week 1":
If there the number of variable work weeks is more than 1, more than 1 work weeks can be setup for the resource up to the number of variable work weeks defined in Resource Options & User Fields. In the above example, if 2 variable work weeks is selected the resource may have a second work week as in the example below. Note that the work week is "Week 2" with capacity defined from Monday to Thursday is different than work week 1 above that has capacity from Monday to Friday:

To add a new resource profile, click the Add a New Profile button. To edit an existing profile, click on the existing profile in the Current profiles: list box and the current profile will be displayed.
To add a new profile, perform the following steps:
- Add a New Profile Click on the Add a New Profile button.
- Type of Work Enter the type of work for the new profile. After you have entered the type of work and leave the prompt, the work week grid is automatically populated with the standard hours per shift and hours per operations from the resource header tab based the type of work's settings (i.e. which shifts and days the type of work has defined).
- Non Contig. Hours If the resource will allow non contiguous scheduling, enter the minimum hours that must be available before the resource will be scheduled with a non contiguous load. If an operations's load must not be interrupted (i.e. one contiguous load) then enter zero hours to this prompt. If the resource type is Move or Wait then this prompt is grayed out as it does not apply to Move or Wait resources.
- Default Profile If the profile will be the default profile then check the Default Profile box.
- Constrained If the profile will be finite (i.e. constrained by the hours per shift) then this box is checked. If the profile for the resource will allow infinite loading, make sure that the box is not checked. If the resource type is Move or Wait then this prompt is grayed out as it does not apply to Move or Wait resources.
- Standard Hours If the profile will be used as the "standard hours" to calculate when a resource is working overtime, select this check box. The standard hours are used to calculate overtime in the Overtime Analysis.
- Available You cannot tab to this field; you must use the mouse. The Available check box defaults to yes (checked) for new resource profiles. It is used to identify if the resource profile is available for you to use during the scheduling of operations. If Available is not checked, then the resource profile cannot be used for scheduling purposes. Note that once a resource profile has been used by an operation, even if the operation is in history (i.e. the job state is history), the resource profile cannot be deleted. If you would like to remove a resource profile so that it can no longer be used for planning, remove the check mark from the Available prompt.
- Auto Reporting You cannot tab to this field; you must use the mouse. Auto Reporting defaults to no meaning that DMS expects you to report on the status of the operations using this resource. If you want auto reporting, Add the check mark to this check box. If the resource type is Move or Wait then this prompt is grayed out as it does not apply to Move or Wait resources.
- Start when previous complete You cannot tab to this field; you must use the mouse. The default is for this field to not be checked. If you want operations using this resource to automatically start when the previous operation has been completed, check the Start when previous complete. If the resource type is Move or Wait then this prompt is grayed out as it does not apply to Move or Wait resources.
- Start operation on new day You cannot tab to this field; you must use the mouse. The default is for this field to not be checked. If you want operations using this resource to start on a new day (next available day) after the end of the previous operation, check the Start operation on a new day. If the resource type is Move or Wait then this prompt is grayed out as it does not apply to Move or Wait resources.
- Start next op. on new day You cannot tab to this field; you must use the mouse. The default is for this field to not be checked. If you want operations that follow operations using this resource to start on a new day (next available day), check the Start next op. on new day. If the resource type is Move or Wait then this prompt is grayed out as it does not apply to Move or Wait resources.
- Complete when next op. started You cannot tab to this field; you must use the mouse. The default is for this field to not be checked. If you want operations that are using this resource to automatically be completed when the next operation starts (i.e. Break commands), check the complete when next op. started. If the resource type is Move or Wait then this prompt is grayed out as it does not apply to Move or Wait resources.
- Week Select the week number you want to define. Depending on the resource variable week options, from 1 to 4 work weeks can be defined.
- Week Available Click on the Week Available check box. If the Week Available is not selected, the work week is not available for the scheduler to use.
- Work Week Grid The work week grid is where you define each day's capacity for each shift. Each shift requires that has the hours per shift and the hours per operation be defined. If a shift does not have any capacity, then both of these fields should be zero for the shift. You can zero the entire grid by clicking on the Zero Grid button. You can also the type of work defaults to the grid using the standards set on the resource header by clicking on the Grid Defaults button.
- Click Save to save the new or edited resource profile. Click Cancel to cancel the addition or changes made. After clicking Save or Cancel the "<new profile>" will automatically be highlighted ready for a new action.
Note: If you are using 2 or more variable work weeks and you define only week 1 for a profile, the scheduler will use week 1 for the undefined work weeks. For example, if you have two variable work weeks and for a resource you define only Week 1, the scheduler will use Week 1’s profile when scheduling work week 1 or work week 2.
You can click on File | Delete to delete an existing resource profile. For example, to delete the resource profile "2nd Shift OT" for a given resource you would select the resource in the tree view by clicking on the resource, select the "2nd Shift OT" profile from the Current profiles lst box and then select delete. DMS will confirm the delete with a window as follows:

If you click OK, the resource profile will be deleted. Click Cancel to cancel the delete. Note that you cannot delete a profile that is used by an operation; however, you can make a resource profile unavailable for future use by removing the check for the Available prompt for the resource profile.

