Dispatch Chart
Previous Topic  Next Topic 

The Dispatch Chart shows the work assign to one or more resources for a given time period.  The dispatch is independent of the selections made in Mfg Orders Job Grid.  When the Dispatch Chart appears, information is not displayed until Resource Selections are made and the Search button is pressed.  The columns to be displayed in each job cell is set in the Job Cell Selections.


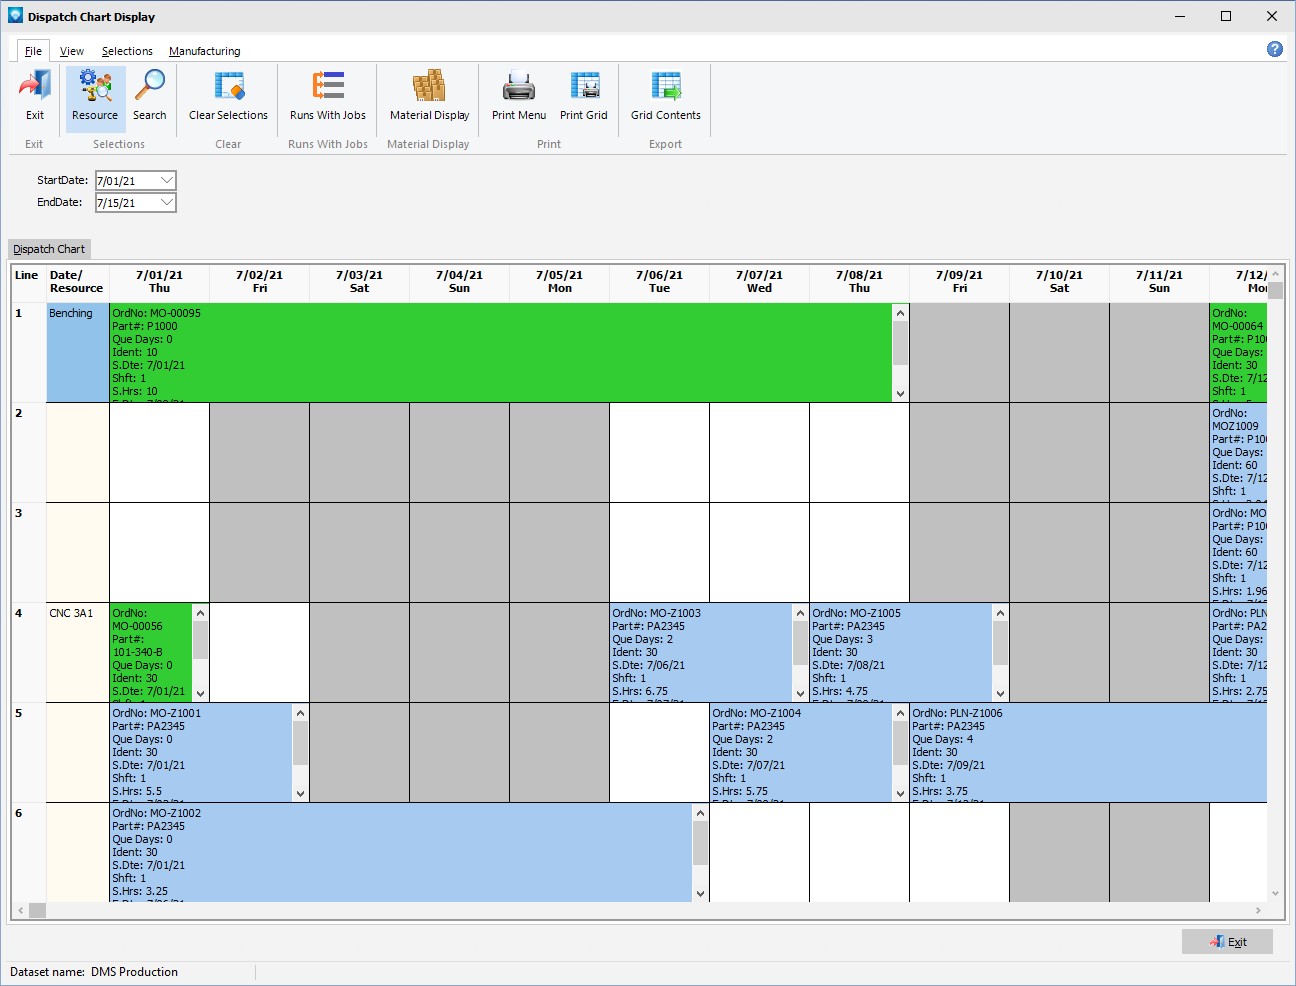
The example below shows a dispatch chart for the resources Benching and  CNC 3A1 starting on 7/01/21 and ending on 7/15/21:


You can resize the columns by positioning the mouse over the bar between the columns in the heading and drag the column to the desired width. 


The following tabs and commands are available:


File

  1. Resource Selections  Select Selections | Resources to select resources, pools or departments to graph.
  2. Search  Click on Search to perform the job search.
  3. Clear Selections  To clear your current search criteria, click on the Clear Selections button. 
  4. Runs With Jobs A Runs With Job Group can be setup.  Select the job to be a runs with job and select File | Runs With Jobs.  The Runs With Jobs Window appears.
  5. Material Display  Select File | Material Display to display the material for the current selected job.
  6. Print Menu Select File | Print Menu to print a DMS Report as setup by Module Report Settings.
  7. Print Grid  Select File | Print Grid to print the current Grid graph. 
  8. Export Grid Contents 


View

  1. Job Cell Selection Sets the job and operation fields to display in the cell on on the grid.
  2. Dispatch Chart Options
  3. Default menu tab


Selections

  1. Resource Selections  Select Selections | Resources to select resources, pools or departments to graph.
  2. Search  Click on Search to perform the job search.
  3. Clear Selections  To clear your current search criteria, click on the Clear Selections button. 


Manufacturing

  1. New Job to add a new job.
  2. Edit Job to edit the first job in the Manufacturing Order job tree.
  3. Calendar/Capacity Changes are changes you want to make to the manufacturing calendar such as holidays, planned overtime, planned shut downs, etc.
  4. Resources  is used to add, edit, delete resource settings.
  5. Schedule Run  Run a global schedule.
  6. Job Updating  is used to manually enter detailed time updates to a job.
  7. Start/Stop Clock  Select Manufacturing | Start/Stop Clock to to update a job with times and quantities typically used by a timekeeper or shop floor personnel.
  8. Start/Stop Clock Edit  If using Start/Stop Clock Updating, select Manufacturing Start/Stop Clock Edit to edit existing start/stop clock entries. 
  9. Quick Updating  Select Manufacturing | Quick Updating Quick Job Updating to perform a quick job update with times and quantities without all the displayed details used in Job Updating.


A right click on the grid will display the popup menu shown below.


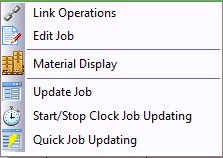
Valid popup commands are:


  1. Link Operations Select this command to display the Linked Operations window to link two or more operations together.
  2. Edit Job Enables you to edit the current selected job.
  3. Material Display Enables you to display the current material for the job.
  4. Update Job Select this command to display the Job Updating window for the current selected job.
  5. Start/Stop Clock Job Updating Select this command to display the Start/Stop Clock Job Updating window for the current selected job.
  6. Quick Job Updating Select this command to display the Quick Job Updating window for the current selected job.


Other commands are:

  1. Start Date The start date defaults to the first day of the schedule.  A new start date can be entered.
  2. End Date The end date defaults to the first day of the schedule plus the default number of days as set in the Dispatch Chart Options (shown below).  A new end date can be entered.


If there are more lines of job information then can be displayed in the job cell, the job cell can be scrolled up and down by clicking on the up and down arrows the job cell: 


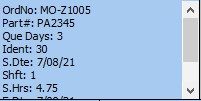
When you hover the mouse cursor over a cell, the all information in the cell is displayed in a popup comment as in the example below for MO-00056 on CNC 3A1:


Dispatch Chart Options


To change the Dispatch Chart options, select View | Dispatch Chart Options.  The following window appears:


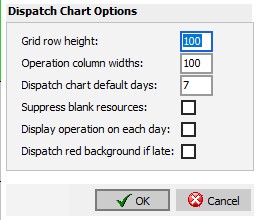
The following options are available:


  1. Grid row height The grid row height can be between 15 and 300 pixels.  The larger the number, the more lines of information can be displayed in the cell.
  2. Operation column widths The operation column width can be from 50 and 300 pixels.  This option sets the default column widths for all columns.  Individual columns can be adjusted by drag select the | on the column header of the gird.
  3. Dispatch chart default days The End Date for the display is set to the Schedule Start Date plus the number of default days. The default days can from 1 to 100 days.
  4. Suppress blank resources If selected, resources that do not have any scheduled work for the selected date range are not displayed in the chart.
  5. Display operation on each day If selected, the job cell information is displayed on each day the operation is scheduled.  If not selected the job cell is stretched across all the days the operation is scheduled.
  6. Dispatch red background if late If selected, if a job is late the job cell is displayed with a red background.