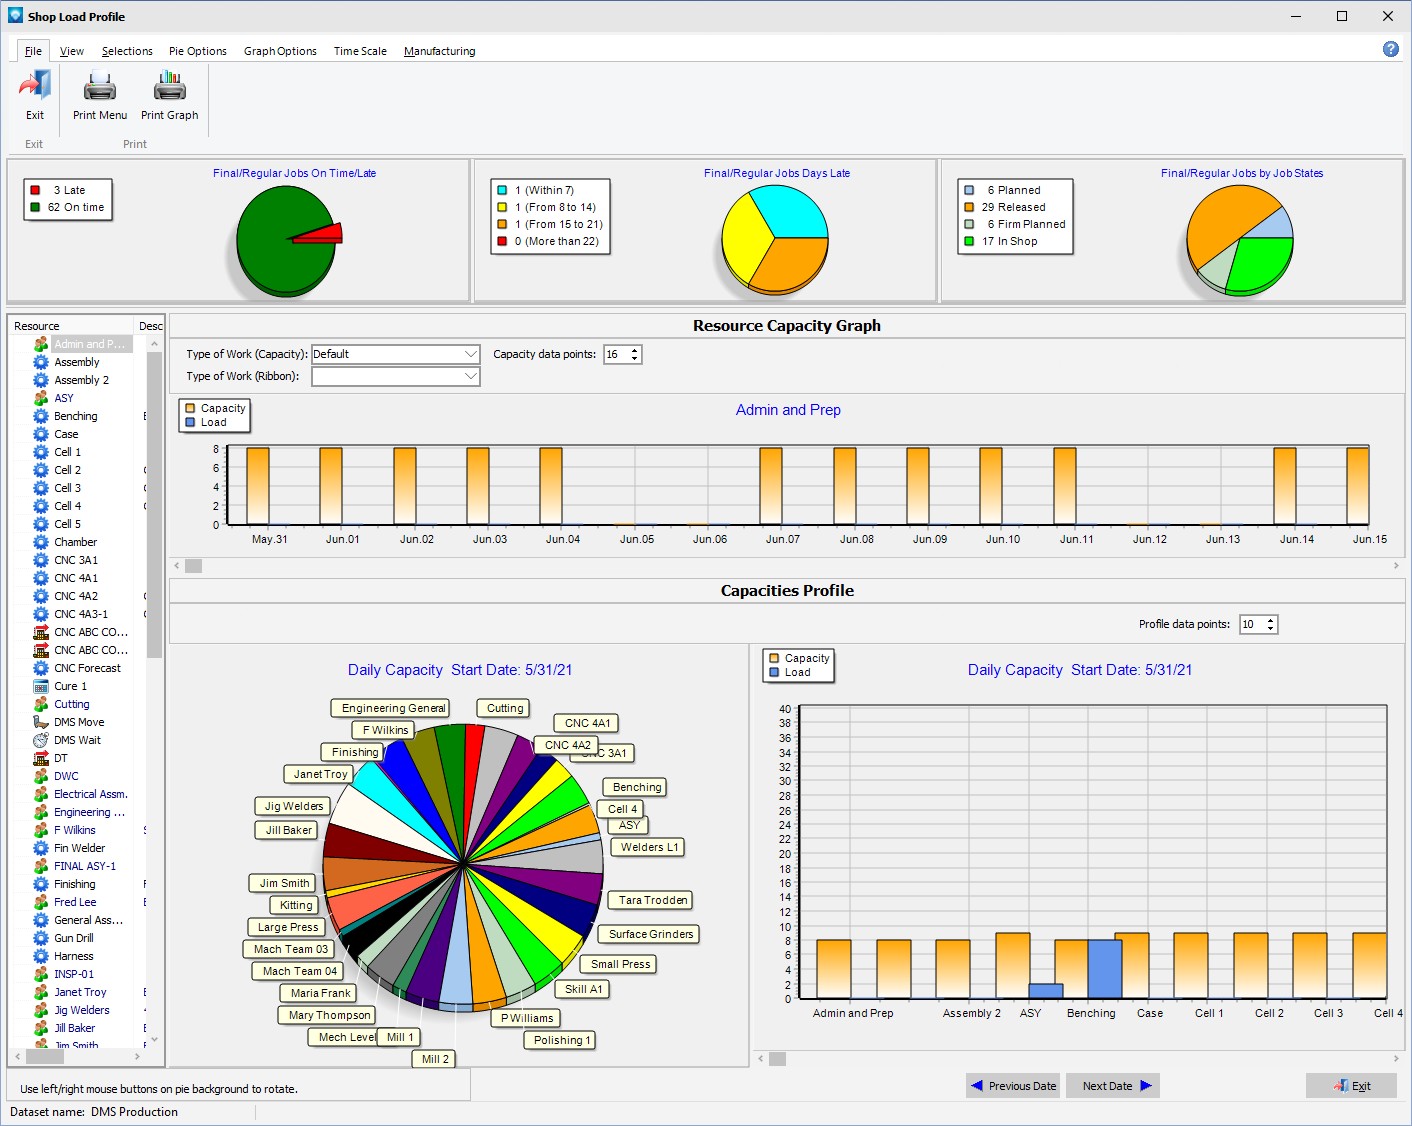
Shop Load Profile Graph |
|
The Shop Load Profile Graph gives you a quick snapshot of what is happening on the shop floor. It is executed from the Manufacturing Orders Job Grid, Graphs | Load Profile.
The Shop Load Profile Graph consists of four pie charts and two bar capacity bar charts. The pie charts display:
1.Number of jobs late versus jobs on time.
2.A break down of the late jobs into categories of days late. The days late categories can be set by each user.
3.A breakdown of jobs by job state. The job states to be displayed can be selected by the user.
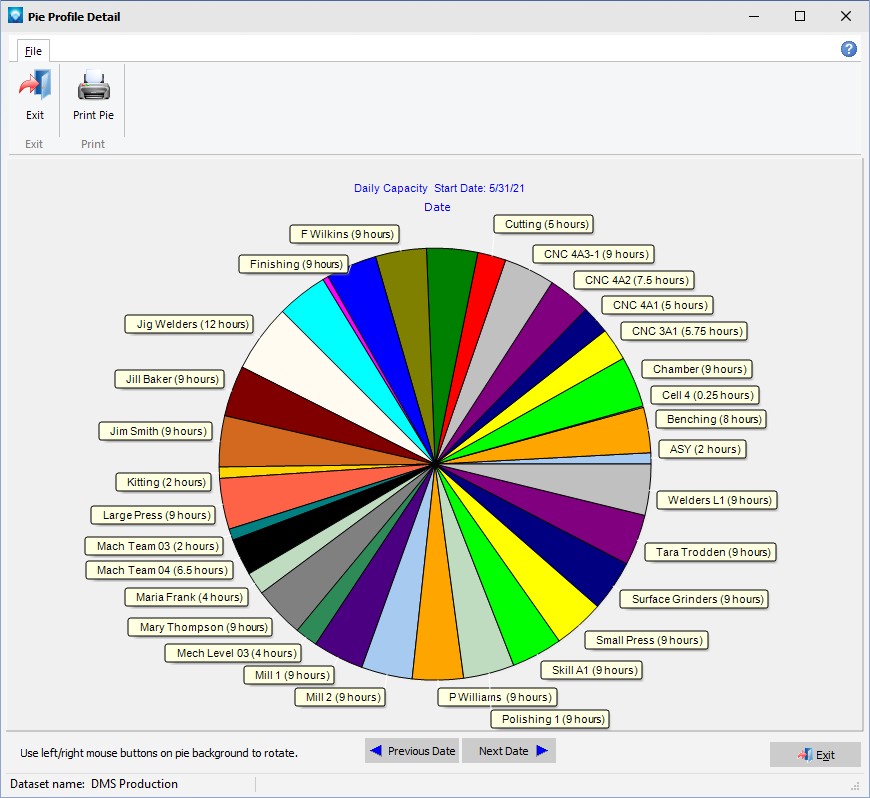
4.Capacity profile of all resources. Click on a pie slice of the profile pie to see a larger detailed version of the profile pie.
The bar charts display:
1.The resource capacity for the resource selected in the tree on the Resource Capacity Graph.
2.All resources (or a sub set of resources if selected) for the given time period on the Capacities Profile Graph.
An example of the Shop Load Profile Graph appears below. There are splitter bars around the graphs so that you can resize the pie charts and graphs to suit your needs:
The following tabs and commands are available:
File
1.Print Menu Select File | Print Menu to print a DMS Report as setup by Module Report Settings.
2.Print Graph Select File | Print Graph to print the current graphs. The Resource Tree is not printed with the graphs.
View
Selections
1.Jobs Select Selections | Jobs to select jobs based on the job header information.
2.Resource Selections Select Selections | Resources to select resources, pools or departments to graph.
3.Final Assembly/Regular Jobs Select Selections | Final Assembly/Regular Jobs to toggle on the option to include final assembly jobs and regular jobs only in the pie count.
4.Selected Jobs Select Selections | Selected Jobs to toggle on the option to include only jobs that were selected in the pie count.
5.Mfg Orders Job Grid Select Selections | Mfg Orders Job Grid to toggle on the option to include all jobs that were selected in the Mfg Orders Job Grid in the pie count.
Pie Options
1.Pie Options Select Pie Options to change the options for the pie charts as follows.
2.Equal Size Pies Select Pie Options | Equal Size Pies to make the three top job pies of equal size.
3.Pie Profile by Hours Select Pie Options | Pie Profile by Hours to set the left bottom pie profile to be calculated by hours.
4.Pie Profile by Head Count Select Pie Options | Pie Profile by Head Count to set the left bottom pie profile to be calculated by hours. The Pie Profile by Hours is also automatically selected.
5.Pie Profile by % Select Pie Options | Pie Profile by % to set the left bottom pie profile to be calculated by percent of load.
6.3D Pie Profile Select Pie Options | 3D Pie Profile to display the left bottom pie profile in 3D.
Graph Options
1.Overlay Bars Select Graph Options | Overlay Bars to show the bars on the bar graph are overlayed on top of each other. This option can be toggled on or off.
2.Show Labels Select Graph Options | Show Labels to show each bar with labels displaying the numerical total of each bar. This option can be toggled on or off.
3.Percent Load Select Graph Options | Percent Load to display the bars in percentage load. This option can be toggled on or off.
4.Theme Select Graph Options | Theme to change the appearance of the graphs. Various themes and colors can be selected and will affect both the pie charts and the bar charts. The 3D selection in the themes affects the bar charts only.
Time Scale
1.Time Scale (Resource Capacity) The Time Scale for the resource capacity graph (top bar graph) can be one of the following:
1.Shifts
2.Days
3.Weeks
4.Months
5.Quarters
2.Time Scale (Capacities Profile) The Time Scale for the capacities profile graph (bottom bar graph) can be one of the following:
1.Shifts
2.Days
3.Weeks
4.Months
5.Quarters
Manufacturing
1.New Job To add a new job.
2.Edit Job To edit the first job in the Manufacturing Order job tree.
3.Calendar/Capacity Changes are changes you want to make to the manufacturing calendar such as holidays, planned overtime, planned shut downs, etc.
4.Resources is used to add, edit, delete resource settings.
5.Schedule Run Run a global schedule.
6.Job Updating is used to manually enter detailed time updates to a job.
7.Start/Stop Clock The Start/Stop Clock Updating is an alternate method to update a job with times and quantities typically used by a timekeeper or shop floor personnel.
8.Start/Stop Clock Edit If using Start/Stop Clock Updating, the Edit Start/Stop Clock Job Updating enables an authorized user to edit existing start/stop clock entries.
Other commands that are available are:
1.The pie charts are calculated using all final and independent jobs when you first enter into Shop Load Profile. You can change the pie calculations to use one of three methods (selected by the radio grouping above the first pie chart) to use:
1.All final and independent jobs (default).
2.Job selections. These are jobs selected by using the Job Selections button in the Shop Load Profile graph.
3.Mfg Orders Job Grid Selections. These are jobs currently in the Manufacturing Orders Job Grid.
2.Display Jobs Clicking on a pie slice will display a list of jobs in the Job Grid Display that make up that slice of pie.
3.Pie Chart Detail For the top three pie charts you can click on the title of the pie chart to display a popup window with details of the pie chart.
4.Rotate Pie Chart Any pie on the graph can be rotated by a left/right mouse click on the background of the pie chart. Each click of the mouse rotates the pie chart left or right by 10 degrees. This enables you to rotate a pie in order to get a better view of the pie slices.
5.Type of Work (Capacity) The type of work above the Resource Capacity Graph for the capacity bars (orange bar) can be changed by selecting a new Type of Work.
6.Type of Work (Ribbon) A ribbon can be added as a third parameter to the Resource Capacity Graph displaying a different Type of Work. The ribbon enables you to compare the capacity type of work, the current load, and a ribbon type of work all in one graph. The Type of Work Ribbon prompt appears above the capacity graph.
7.The Capacity data points are shown above the capacity graph and are the number of shifts, days, weeks, months, or quarters you want to appear on the bar charts. The data points to graph on each bar chart are separate; Capacity data points affects the Resource Capacity Graph and Profile data points affects the Capacities Profile graph.
8.Edit Resources Right clicking on the bar charts pulls up a popup menu to edit resources or capacity calendar changes.
9.Display Profile Pie Details Clicking on any slice of the profile pie will display the profile pie in detail in a separate window.
10.Dispatch Display Clicking on a bar in the Resource Capacity Graph pulls up the Dispatch Display for that bar.
11.Use the Group menu item to group the bar graphs by resources, pools, or departments.
12.Resource Tree To change the resource on the Resource Capacity Graph, use the resource tree. The resource tree does not affect the Capacities Profile graph. The resource and pool descriptions (first 40 characters of notes) can be displayed on the shop load profile tree. To display this information, widen the tree by dragging the right side of the tree border.
13.The scroll bar on the Capacities Profile graph moves through the resources.
14.The Previous Date button and Next Date button shown below the Capacities Profile Graph move through the dates on the profile pie and profile bar charts. The current date is displayed on the graphs. When the profile pie detail window is displayed, the previous date and next date on the underlying screen are still functional and the next/previous date is displayed in the profile pie as well as the bar chart.
15.Print one pie or bar chart To print one pie chart or bar chart, right click on a bar chart and select Print Chart and then select a bar chart or pie chart to print. Note that the profile pie chart can only be printed from the profile pie chart detailed view.
16.Print Profile Pie To print the profile pie, display the profile pie detail by clicking on a slice of the smaller profile pie chart and click on the print icon ![]() .
.
The profile pie chart displays the shop profile by resource, pool, or department. If you click on a slice of the profile pie chart, a detailed pie chart is displayed as in the example below. The profile pie can display hours or percentage of pie (select View | Profile Capacity Profile from the main Show Load Profile Graph window). The smaller profile pie chart on the main form does not show the labels of hours or percent amount on the pie chart as it is too crowded; this information is shown in the detail.
When the profile pie chart details are in view, all the underlying view commands work except the 3D setting. This enables you to view the details and make changes to the detailed pie chart. The previous and next date buttons on the Shop Load Profile Graph are also active when the detailed profile pie is displayed and will display the previous/next day on the profile pie.
Example of the profile pie chart display hours loaded for the May 31, 2021: