Dispatch Display |
|
The Dispatch Display shows the work assigned to a resource for a given time period. The dispatch is independent of the selections made in Manufacturing Orders Job Grid. When the Dispatch Display appears, the default start date and end date are set to the first day of the schedule and the first resource (sorted alphabetically) is displayed on the screen. The columns displayed are set in the Dispatch Display Grid Selections.
The example below shows a dispatch display for the resource Benching:
.png)
You can resize the columns by positioning the mouse over the bar ![]() between the columns in the heading and dragging the column to the desired width. The Job Notes, Operation Notes, and Material Notes can be displayed by double clicking on the notes cell in the grid. For more information, please see Displaying Notes.
between the columns in the heading and dragging the column to the desired width. The Job Notes, Operation Notes, and Material Notes can be displayed by double clicking on the notes cell in the grid. For more information, please see Displaying Notes.
The following tabs and commands are available:
File
1.New Job Add a new job using Manufacturing Order Job Details
2.Edit Job Edit the selected job using Manufacturing Order Job Details
3.Runs With Jobs A Runs With Job Group can be set up. Select the job to be a Runs With job and select File | Runs With Jobs. The Runs With Jobs Window appears.
4.Link Jobs by Jobs Operations Enables you to select operations within two or more jobs to run together.
5.Material Display Select File | Material Display to display the material for the current selected job.
6.Print Menu Select File | Print Menu to print a DMS Report as setup by Module Report Settings.
7.Print Grid Select File | Print Grid to print the current Grid graph.
View
1.Job/Operation Columns Select the jobs columns you want to see in the Job Grid.
Options
1.Operations in Pools Only Toggle this button on/off. If On and a dispatch by Pools is displayed, the operations must have the selected pool name. If off, then any operation that uses a resource that is a member of the pool will be displayed. That is, the operation does not specifically need to have the pool name specified; it will be displayed if the resource is a member of the pool.
2.Current Operations Only
3.Group By Enables you to group the display by Resources, Pools, or Departments. Grouping will display all resources dispatched under the group selected. For example, if you select a grouping of pools and then select a pool from the resource tree, the dispatch for all resources within the pool is displayed.
4.Sort By The Sort By menu item enables you to change the sort order of the information displayed in the dispatch grid. Valid sort selections are:
1.Start Date
2.Start Date + Previous Operation Status
3.Previous Operation Status + Start Date
4.Start Date + Current Status + Previous Operation Status
5.Order Number + Operation Sequence
5.If the display is grouped by Pools or Departments the above sort applies, but you also have additional capabilities. If grouped by Pools, you can also group by:
1.Date within Pools
2.Resource within Pools
3.Operation Description within Pools
6.If grouped by Departments, you can also group by:
1.Date within Departments
2.Resource within Departments
3.Pools within Departments
4.Operation Description within Departments
7.Set Refresh Timer Sets the parameters for the Dispatch Display to be automatically refreshed every given number of minutes. For example, the Dispatch Display can be set up to automatically refresh every 30 minutes. The automatic refresh can be used when the dispatch is displayed for a group of workers to see the most recent status of work. When selected, the following window is displayed:.png)
The following prompts are entered:
1.Automatic Start Refresh Timer Select this checkbox to instruct DMS to run the automatic refresh.
2.Set Refresh Timer in minutes Enter the number of minutes to wait before each refresh of the Dispatch Display. The minimum time is 1 minute and the maximum time is 999.99 minutes.
3.On Refresh Set Start/End Date Range The Start and End Date for the Dispatch Display can remain as is for the refresh, or it can be reset to the Schedule Start Date plus a given number of days:
1.Do not reset user entered Start/End Date Select this option to not change the start/end date when the dispatch is refreshed.
2.Set Start/End Date to Schedule Date Plus days Select this option to set the start date of the dispatch to the Schedule Start Date plus the number of days entered by the user. This option takes into account schedule runs that may specify a new Schedule Start Date while the dispatch is displayed.
4.Click the OK button to set the new parameters, or select Cancel to ignore the changes.
8.Start Refresh Timer After the options for the refresh timer have been set, click on the Start Refresh Timer menu button to start the timer to refresh the display. To turn off the refresh, click on the Start Refresh Timer to deselect the button. (See Dispatch Display Refresh Example below as an example of the Dispatch Display when the refresh timer is active.)
Selections
1.Resource Selections Select Selections | Resources to select resources, pools or departments to display.
2.Search Click on Search to perform the job search.
3.Clear Selections To clear your current search criteria, click on the Clear Selections button.
Manufacturing
1.New Job To add a new job.
2.Edit Job To edit the first job in the Manufacturing Order job tree.
3.Calendar/Capacity Changes are changes you want to make to the manufacturing calendar such as holidays, planned overtime, planned shut downs, etc.
4.Resources is used to add, edit, delete resource settings.
5.Schedule Run Run a global schedule.
6.Job Updating is used to manually enter detailed time updates to a job.
7.Start/Stop Clock The Start/Stop Clock Updating is an alternate method to update a job with times and quantities typically used by a timekeeper or shop floor personnel.
8.Start/Stop Clock Edit If using Start/Stop Clock Updating, the Edit Start/Stop Clock Job Updating enables an authorized user to edit existing start/stop clock entries.
A right click on the Job Summary Grid will display the popup menu shown below:
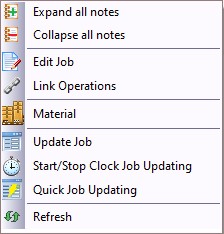
Valid popup menu commands are:
1.Expand all notes Will expand all note columns in the grid to multiple lines.
2.Collapse all notes Will collapse all note columns in the grid to one line.
3.Edit Job Enables you to edit the current selected job.
4.Link Operations Select this command to display the Linked Operations window to link two or more operations together.
5.Edit User Field The Edit User Field menu item will appear if you right click on a column that is a user field. For example, if a right click on the user field "Work Instruction" occurred, a window appears enabling you to change the user field. Note that the user must have permission to edit user fields:

6.Material Display Enables you to display the current material for the job.
7.Quick Job Updating Select this command to display the Quick Job Updating window for the current selected job.
8.Start/Stop Clock Job Updating Select this command to display the Start/Stop Clock Job Updating window for the current selected job.
9.Update Job Select this command to display the Job Updating window for the current selected job.
Other commands:
1.Resource A resource can be entered or selected from the Resource prompt or click on the resource tree to select a resource.
2.Start Date The start date defaults to the first day of the schedule. A new start date can be entered.
3.End Date The end date defaults to the last day of the schedule. A new end date can be entered.
The example below shows a dispatch display grouping by pools where the pool CNC 3+ Axis has been selected. There are several different resources that are members of this pool:

Multiple Resources, Pools, or Departments can be displayed at once by using the Ctrl key and clicking on the item in the tree to display. A right click on the tree will display a popup menu enabling the use to select or unselect all items in the tree:

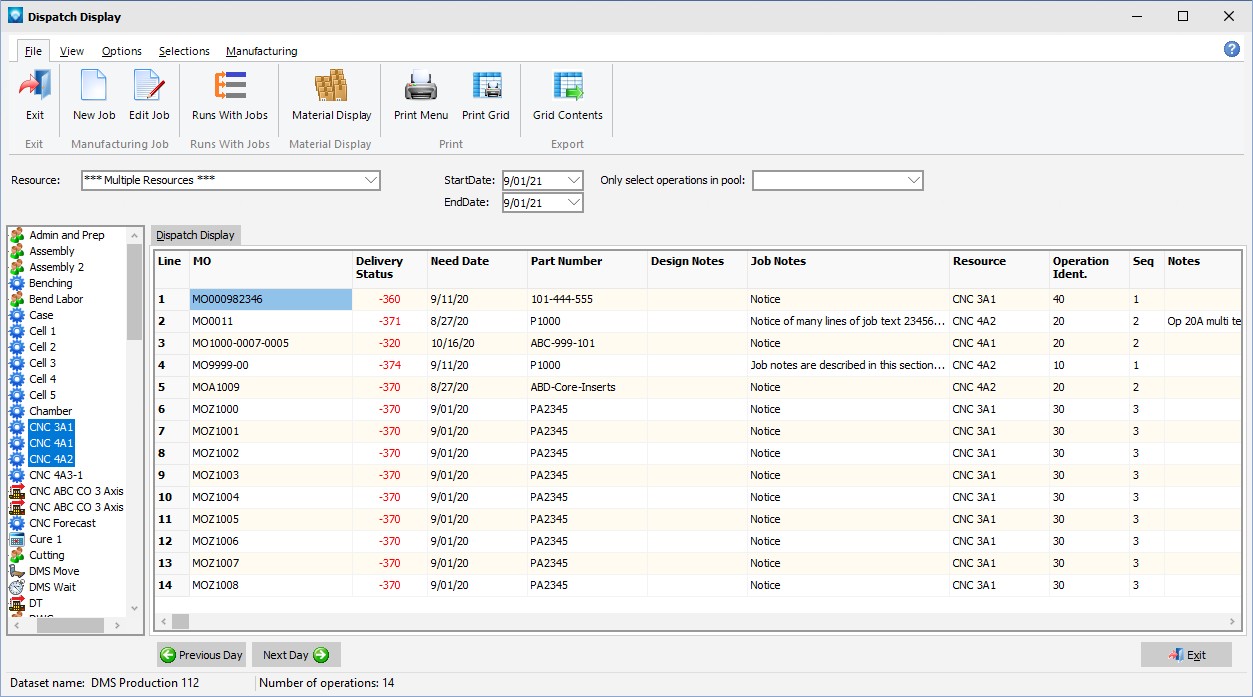
The example below shows the Dispatch Display with three resources selected in the tree. The three selected resources are displayed in the Dispatch Display grid:
If you select all items in the tree to be displayed, the loading of information into the grid may take some time, depending on the volume of information.
Dispatch Display Refresh Example
The example below shows the Dispatch Display with the Set Refresh Timer menu button selected. The display shows the status of the refresh at the bottom of the window and in this example, the Dispatch Display will be refreshed every 15 minutes and the time of the last refresh:
.png)
When the Dispatch Display is within 30 seconds of being refreshed, the status is displayed in red with a message that the display will be refreshed within 30 seconds as in the example below:
.png)