Job Summary Display |
|
The Job Summary Display shows a summary of jobs and their operations status on a single line. When the Job Summary Display appears, information is not displayed until the Search button is pressed. The display can be dependent on the selections made in Manufacturing Orders Job Grid if the Use Mfg Orders Job Grid Selections is checked, or selections can be made using the Job Selections button.
The job columns to be displayed for each job are set in the View | Job Column Selections. Each operation cell can have the following information displayed:
1.Operation Sequence number
2.Operation Ident.
3.Resource Name
4.Start and End Dates
5.Operation Status.
The operation cells have a background color of blue for scheduled, green for in-process, gray for completed, and tan for other operations, such as for Hold, Hold Until, etc.
The Operations sequence number is displayed in the header of the grid operation cells.
The example below shows Job Summary Display for the project 100.000.100:
.png)
The columns can be resized by positioning the mouse over the bar between the columns in the heading and dragging the column to the desired width. The Job Notes and Material Notes can be displayed by double clicking on the notes cell in the grid. For more information, please see Displaying Notes.
The following tabs and commands are available:
File
1.New Job Add a new job using Manufacturing Order Job Details.
2.Edit Job Edit the selected job using Manufacturing Order Job Details.
3.Runs With Jobs A Runs With Job Group can be set up. Select the job to be a runs with job and select File | Runs With Jobs. The Runs With Jobs Window appears.
4.Link Jobs by Jobs Operations Enables you to select operations within two or more jobs to run together.
5.Material Display Select File | Material Display to display the material for the current selected job.
6.Print Menu Select File | Print Menu to print a DMS Report as setup by Module Report Settings.
7.Print Grid Select File | Print Grid to print the current Grid graph.
View
1.Job Grid Columns Select the jobs columns you want to see in the Job Grid.
2.Job Summary Options To change the Job Summary Display options, select View | Job Summary Options.
Selections
1.Jobs Select Selections | Jobs to select jobs based on the job header information. If selected, the Mfg Orders Job Grid is automatically toggled off.
2.Mfg Orders Job Grid Select Selections | Mfg Orders Job Grid to toggle on the option to include all jobs that were selected in the Mfg Orders Job Grid in the pie chart.
3.Clear Selections To clear your current search criteria, click on the Clear Selections button. DMS will confirm the clearing of selections.
4.Search Click on Search to perform the job search.
Manufacturing
1.New Job To add a new job.
2.Edit Job To edit the first job in the Manufacturing Order job tree.
3.Calendar/Capacity Changes are changes you want to make to the manufacturing calendar such as holidays, planned overtime, planned shut downs, etc.
4.Resources is used to add, edit, delete resource settings.
5.Schedule Run Run a global schedule.
6.Job Updating is used to manually enter detailed time updates to a job.
7.Start/Stop Clock The Start/Stop Clock Updating is an alternate method to update a job with times and quantities typically used by a timekeeper or shop floor personnel.
8.Start/Stop Clock Edit If using Start/Stop Clock Updating, the Edit Start/Stop Clock Job Updating enables an authorized user to edit existing start/stop clock entries.
A right click on the Job Summary Grid will display the popup menu shown below:

Valid popup commands are:
1.Edit Job Edit a job by double clicking on the job order number or the job bar, or highlight the job and select File | Edit Job, or click on the edit icon ![]() .
.
2.Runs With Jobs A Runs With Job Group can be set up by selecting the job to be a Runs With job and either select File | Runs With Jobs or right click on the Job Tree and select Runs With Jobs from the popup menu. The Runs With Jobs Window appears.
3.Material Display Use the right mouse button and select Material Display to display the material for the job using Material Display.
4.Update Job Update a job using Job Status Updating by highlighting the job or operation within a job and either select File | Job Updating or click on the job updating icon ![]() .
.
5.Start/Stop Clock Updating To select Start/Stop Clock Updating, use the right mouse button and click on a job or operation in the job tree.
6.Quick Job Updating To select Quick Job Updating, use the right mouse button and click on a job or operation in the job tree.
7.Refresh to refresh the Job Summary grid.
When Job Summary Options is selected, the following window appears:
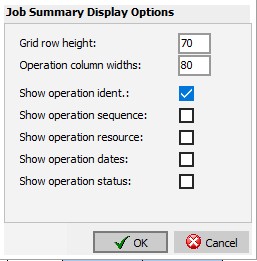
The following options are available:
1.Grid row height The grid row height can be between 15 and 300 pixels.
2.Operation column widths The operation column widths sets the default width of all the Operation Ident columns. The width can be from 35 and 300 pixels.
3.Show operation ident If selected, the operation ident is displayed in the Operation cell.
4.Show operation sequence If selected, the operation sequence number is displayed in the Operation cell.
5.Show operation resource If selected, the operation resource is shown in the Operation cell.
6.Show operation dates If selected, the operation start and end dates are shown in the Operation cell.
7.Show operation status If selected, the operation status is shown in the Operation cell.