The Job Updating Options are used to define what prompts need to be entered when reporting on the status of a job and what prompts are to be entered when using Quick Job Updating. To access Job Updating Options, from the DMS Monthly Calendar Menu, select Options | Job Updating Options or from Job Status Updating and select Options | Job Updating Options. There are five tabs:
- Options tab
- Prompts tab
- Quick Job Updating tab
- Start/Stop Clock Updating tab
- Verification tab
Options Tab
The options tab is used to set certain options for Job Status Updating.
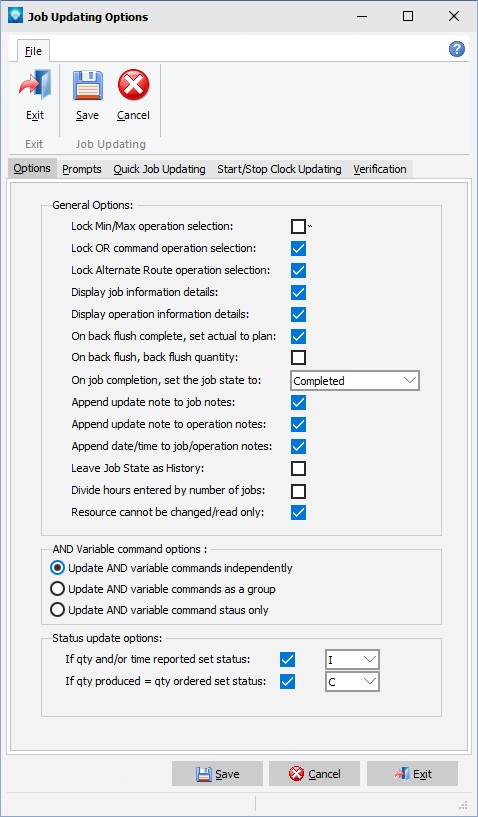
The options for job status updating are as follows:
-
Lock Min/Max operation selection If checked this option will lock the number of min/max AND command resources currently assigned. If unchecked the DMS scheduler may reassign the number of resources used (within the Min/Max parameters) on the next schedule run.
-
Lock OR command operation selection If checked this option will lock the OR command resources currently assigned. If unchecked the DMS scheduler may reassign the resource on the next schedule run.
-
Lock Alternate Route operation selection Future option If checked this option will lock the Route currently assigned. If unchecked the DMS scheduler may reassign the route(s) on the next schedule run.
-
Display Job Information details This option will display the Job Detail information you see at the right hand side of the Job Status Updating screen
-
Display Operation information details This option will display the Operation Detail information you see at the right hand side of the Job Status Updating screen.
- On back flush complete, set actual to planned If selected and you are using back flushing to update all previous operations, the back flush will set the actual hours to the planned hours for all back flushed options that are being set to completed.
- On Back flush, back flush quantity If set and the current operation is being back flushed, all previous operations’ quantities completed will be set to the quantity completed of the current operation. The quantity completed of the back flushed operations cannot exceed the job’s quantity to build; that is, they will be set to the job’s quantity to build if you try and report back a quantity greater than the job’s quantity to build. If an operation in the back flush group has the option Set Quantity Manually selected, the operation's quantity completed will not be updated by the back flush.
-
On completion, set job state to This option allows you to automatically set the job state when all scheduled operations in a job have been completed.
- Append updates notes to job notes If selected, the updates notes entered to Job Status Updating will automatically be appended to the Job Notes as displayed on the Job tab.
- Append updates notes to operation notes If selected, the updates notes entered to Job Status Updating will automatically be appended to the corresponding Operation Notes as displayed on the Operations tab.
- Append date/time to job/operation notes If update notes are being appended to either the job and/or operation notes, selecting this option will add the date and time to the appended notes.
- Leave job state as history If selected and you are updating a job whose state is history, DMS will leave the job state as history and will not change the job state.
- Divide hours entered by number of jobs If you are updating more than one job during a single transaction (see multiple jobs prompt in the Prompts Tab below) then you have have DMS divide the hours entered by the number of jobs selected. For example, if you have entered 10 hours and are updating two jobs at the same time, if this option is selected each job's hours will be updated by 5 hours; 10 total hours divided by 2 jobs.
- Resource cannot be changed/read only If selected, this option does not allow the user to change the resource the operation was scheduled on during the job status updating.
- AND Variable Command options You can select one of three options for updating AND Variable commands:
-
Update AND Variable commands independently If checked this feature will evenly spreads time, quantity and status reported back to all AND operations.
-
Update AND Variable commands together If checked this feature will evenly spreads time, quantity and status reported back to all AND operations.
-
Update AND Variable command status only If checked this feature overrides the previous feature and will not spread time, quantity and status to all �AND� operations. This allows the user to assign individual updates to specific sequences in the operations.
- Status Update Options You can select none of the options below, one, or both options:
- If qty and/or time reported set status If selected, enter the operation status you want to operation to be assigned to if time or quantity is reported. If you use this option, the operation status is typically set to In process.
- if qty produced = qty ordered set status If selected, enter the operation status you want to operation to be assigned to if quantity produced equals the quantity ordered. If you use this option, the operation status is typically set to Complete.
Click the Save button to save the settings are return to Job Status Updating.
Prompts Tab
The Prompts tab is used to select what prompts you want to see during Job Status Updating and if you want certain prompts to retain their value between updates.
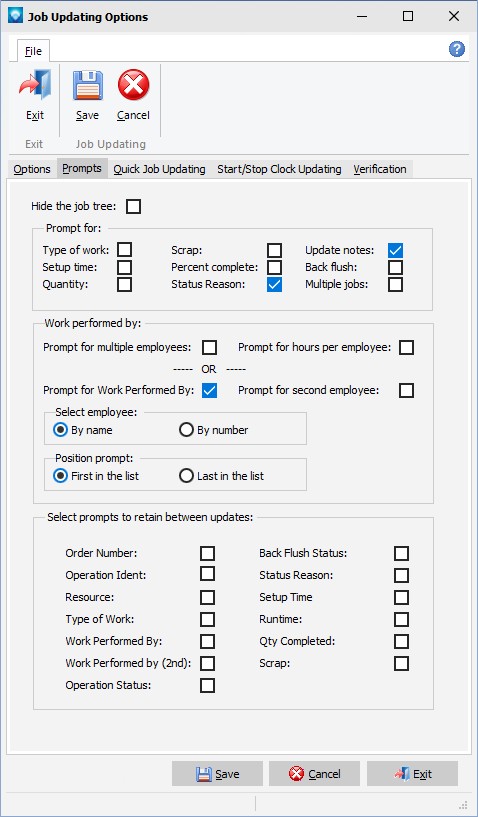
The following selections are on the Prompts tab:
- Hide the job tree If selected, the Job Tree does not appear on the Job Updating window and jobs are selected from the drop down menu. Note that hiding the job tree marginally speeds up the loading of the Job Updating form.
- Prompt for The following prompts can be selected. If selected, the prompt will appear on Job Status Updating. If not selected (unchecked) the prompt will not appear.
- Type of work
- Setup time
- Quantity
- Scrap
- Percent complete
- Reason code
- Update notes
- Back flush
- Multiple jobs If Multiple Jobs is selected, then more than one job at a time can be selected in the Job Tree for updating. Press and hold the Ctrl key and single click on the jobs that you want to update together. Updating multiple jobs at one time means that all the jobs will take on the same update information (i.e. qty updated, operation status, hours, etc.). Note that if the Work Performed by is specified during the update, the employee is attached to the first job only.
- Work performed by The work performed by section enables you to record an employee, two employees, or multiple employees during the update.
- Prompt for multiple employees enable you to select more than one employee at a time for updating. If selected, the following button appears on the Job Status Updating screen
 . When you click on the button you can select multiple employees for updating. You can also select Prompt for hours per employee which enables you to enter hours for each employee being updated. The hours entered do not impact the job hours, operation hours, or schedule in any way; it is simply a means of recording hours against an employee. The following is an example of the Multiple Employees Selection used by Job Status Updating:

- Prompt for work performed by If you are not using multiple employees, you have the option of prompting for just one or two employees. If Prompt for work performed by is selected, a prompt to enter an employee will appear on the Job Status Updating screen. If Prompt for second employee is selected, a second employee will also appear on the Job Status Updating screen.
- Select employee by name or number When entering employees you can select them by the employee name or the employee number. This prompt sets up the default of how you want to select employees on Job Status Updating.
- Position prompt first in the list or last in the list If you are prompting for work performed by, the prompt can appear as the first prompt before the order number, or it can appear at the end of the entries as the last prompt on Job Status Updating.
- Select prompts to retain between updates You can optionally select fields to retain between updates to maximize data entry efficiency. For example, if you are performing all of the updates for a certain employee then you can optionally select to retain the employee so the system defaults to that employee until the clear button is selected. Information that is retained between each update will appear in the prompt when the prompt becomes active. As soon as a new entry is made to the prompt and you press tab or enter, the new entry becomes the new information to retain. Note that one you exit Job Status Updating, the session ends and the prompts will no longer retain their entries. The next time you enter Job Status Updating and make your first entry, that entry will be retained as per the selected prompts below. The following prompts below can have their values retained between updates:
- Order Number
- Operation Ident
- Resource
- Type of work
- Work performed by
- Work performed by (2nd)
- Operation Status
- Back Flush Status
- Reason code
- Setup time
- Runtime
- Qty Completed
- Scrap
Click the Save button to save the settings.
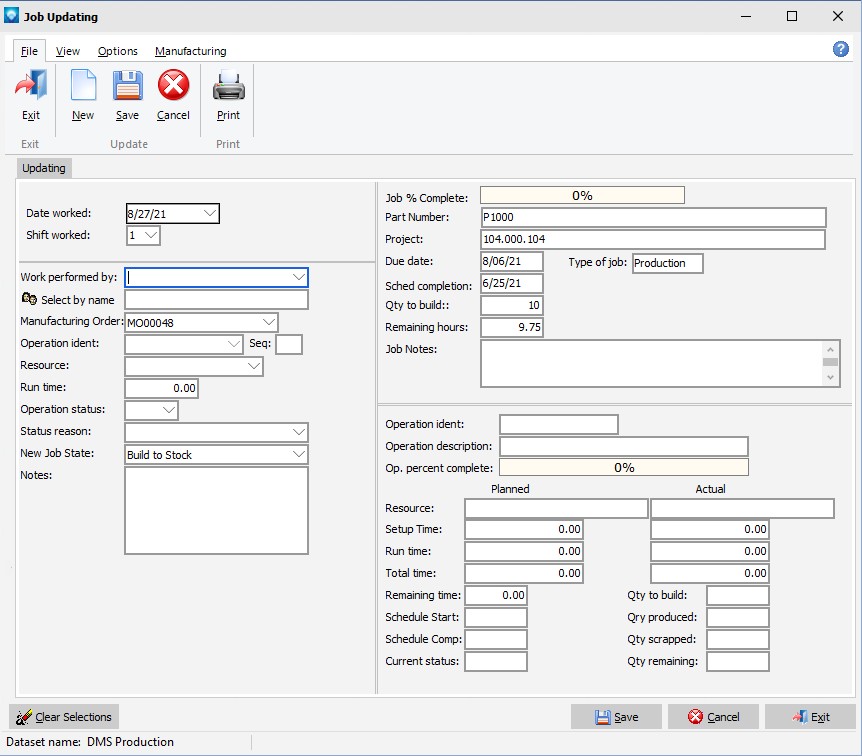
The example below shows the Job Updating window when the job tree is hidden. To select a job the user either enters the Order number or selects the job from the order number drop down list:
Quick Job Updating
The Quick Job Updating tab is used to select what prompts you want to see during Quick Job Updating and to select whether or not the employee name will automatically be filled in and locked if the user can only execute Quick Job Updating when they log in (see User Groups for more information on limiting commands during log on).

The following prompts can be selected. If selected, the prompt will appear on the Quick Job Updating popup window. If not selected (unchecked) the prompt will not appear.
- Type of work
- Setup time
- Quantity
- Scrap
- Percent complete
- Status Reason
- Update notes
- Work performed by The work performed by section on the Quick Job Updating window enables you to record one employee during the update. The Work performed by prompt will appear either first in the list or last in the list on the Quick Job Updating window depending on the selection made on the Prompts tab ( i.e. the Position prompt first in the list or last in the list setting).
- Display user name If selected, the user name is displayed on the Quick Job Updating window.
- Auto fill in employee If this prompt is selected, the employee name prompt on the Quick Job Updating form will automatically be filled in with the employee name associated with the user's name. (See User Passwords for information on associated employee names with users.)
- Lock Employee Selection If this prompt is selected, the user cannot change the employee name in Quick Job Updating.
Start/Stop Clock Updating
The Start/Stop Clock Updating tab is used to select what prompts you want to see during Start/Stop Clock Updating.
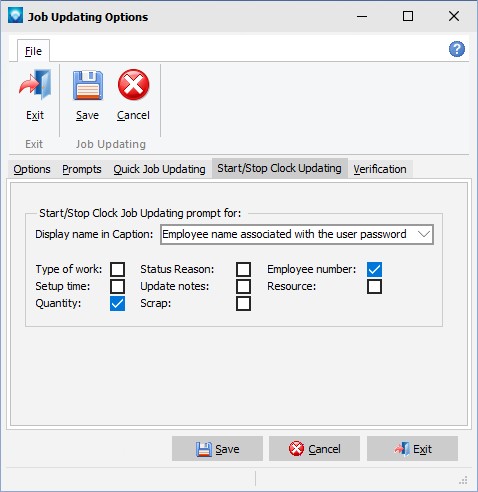
The following prompts can be selected. If selected, the prompt will appear on the Start/Stop Clock Updating popup window. If not selected (unchecked) the prompt will not appear.
- Display name in Caption This prompt enables you to display either the login user name, display user name, display the employee name associated with the user password, or do not display . (See User Passwords for more information on display name, user name, and employee name associated with the user password.)
- Type of work
- Setup time
- Quantity
- Status Reason
- Update notes
- Scrap
- Employee Number If selected, the user must enter a valid employee number to perform an update. (See Employees for more information on Employee Numbers.)
Verification tab
A window verifying the user’s entry in Job Status and Quick Job Updating can optionally be displayed. Note that Start/Stop Clock Updating has its own verification window that appears automatically so the settings on the Verification tab do not affect Start/Stop Clock Updating.
The screen example below shows the Verification tab:
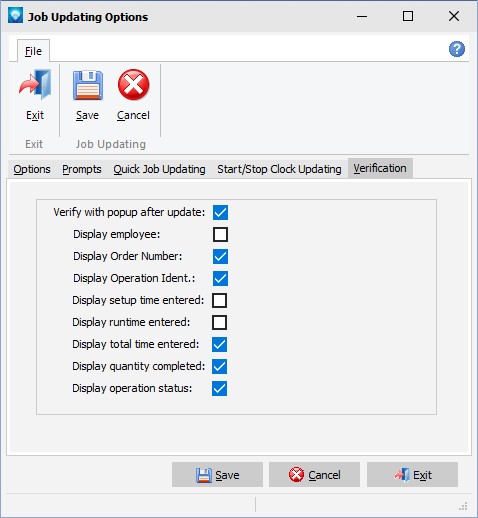
To display a verification after a Job Updating or Quick Job Updating entry, select the prompt Verify with a popup after update. The popup will display the selected prompts.
If set, the verification popup appears after the update has been made to either Job Updating and Quick Job Updating as in the example below:
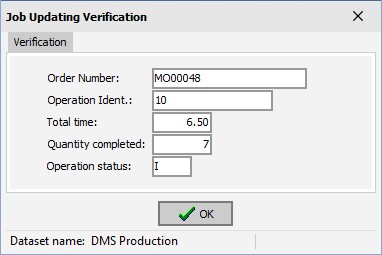
The user would ten press the Enter key or click OK to continue.

