The Multiple Jobs Editor is a powerful tool that enables you to apply the same changes to one or more selected jobs. All of the current jobs listed in the Manufacturing Orders (multiple jobs) grid will have the changes applied to them. That is, only those jobs that are in the Manufacturing Orders job grid will be accessible by the Multiple Jobs Editor
To access the Multiple Jobs Editor, select File | Multiple Jobs Editor or click on the Multiple Jobs Editor icon  in Manufacturing Orders (multiple jobs).
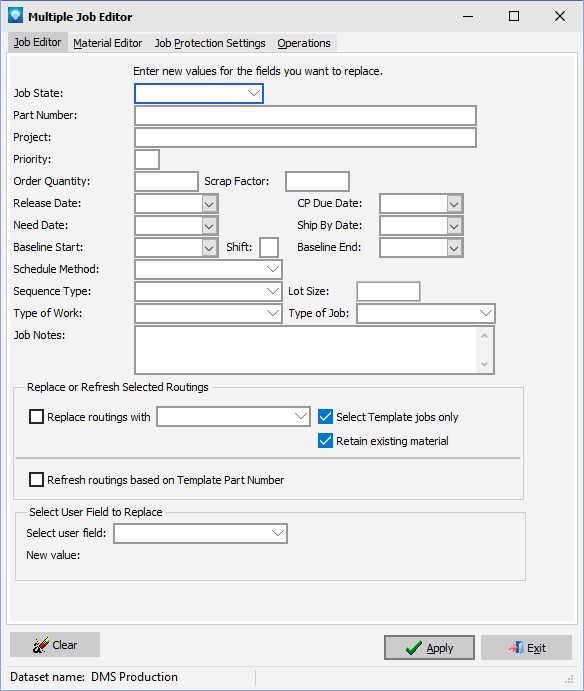
When the Multiple Jobs Editor is selected, the following window appears:
If you enter values for given fields and click the Apply button, all jobs currently in the Mfg Orders grid will have the corresponding fields changed.
Note that fields that you have hidden in Terms and Settings will not be displayed in the Multiple Jobs Editor.
There are four tabs for the Multiple Jobs Editor:
- Job Editor
- Material Editor
- Job Protection Settings
- Operations
Job Editor
You can replace all the jobs� routings with a new routing. If the job in the Mfg Orders grid is marked at WIP (i.e. work in process is checked) that job�s routing will NOT be replaced with the new routing. See the details below on replacing a job's routing.
The following fields can be changed using the Multiple Job Editor tab. To change a field, make a valid entry for the field. To leave a field as is, make sure that the entry field is blank.
- Job State
- Part Number
- Job Identification
- Priority
- Order Quantity
- Scrap Factor
- Release Date
- Release Shift
- Due Date
- Baseline Start Date
- Baseline Start Shift
- Order Date
- Promise Date
- Baseline End Date
- Baseline End Shift
- Schedule Method
- Sequence Type
- Lot Size or Percentage Overlap
- Job Type of Work The job type of work applies to the entire job, but it can be overridden by the operations type of work and by the type of work specified during a schedule run.
- Type of Job
- Job Notes The job notes are a free format field used to describe the job. Information entered into this field can be searched on using Job Selections.
To replace routings, the following options are available. Not that these two selections are mutually exclusive; you can select one or the other:
- Replace routings with This prompt enables you to replace all routings with a select routing. Click on the prompt to set the check box and then select the job from the list of jobs. If Select Template jobs only is checked, only template jobs will appear in the pull down list. If you uncheck Select Template jobs only all jobs will appear in the list of jobs excluding history.
- Refresh routings based on Template Part Number This prompt enables you to scan all the existing jobs (excluding template jobs and history) and replace the routing of the job based on the job's existing template part number. That is, if a job has a part number that matches a template part number the job's routing is replaced with the matching template's routing. If a job does not have a matching part number or no part number at all, it is not updated. Check this prompt to refresh routings based on the jobs' existing part numbers.
If you want to replace the routings of WIP jobs, perform the following steps:
- Use the editor in Manufacturing Orders (multiple jobs) and uncheck the WIP check box for those jobs whose routings you wish to replace.
- You must have security access for your user group to "Mfg Orders Delete WIP Jobs and Option to Delete All Mfg Orders" set as the Multiple Job Editor will need to delete history to replace the routings.
- Click the Apply button and the Multiple Jobs Editor will delete the WIP operations and replace the routing.
- If you do not have the security access to delete WIP jobs with status records, the editor does not replace the routings to the job and continues with the next job. No warning message is displayed.
Job user fields can also be replaced:
- Select user field Select the user field you want to replace from the drop down menu.
- New Value Enter the new value for the selected user field.
Note that you cannot change user fields that are of type Notes, a button with an application or Time.
Material Editor
The Material Editor enables you to perform mass changes on material settings for the jobs list in Manufacturing Orders Job Grid. The screen below is an example of the Material Editor tab:
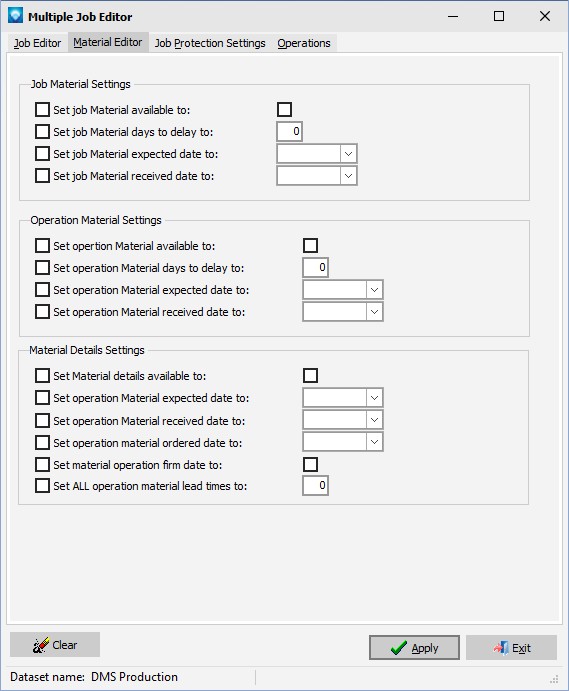
The following fields can be changed using the Multiple Job Editor Material tab. To change a field, select the field you want to change and then make a valid entry for the field. To leave a field as is, do not select the field:
- Set job Material Available to
- Set job Material Days to delay to
- Set job Material Expected date to
- Set job Material Received date to
- Set Operation Material Available to
- Set Operation Material Days to delay to
- Set Operation Material Expected date to
- Set Operation Material Received date to
- Set Material details Material Available to
- Set Material details Material Expected date to
- Set Material details Material Received date to
- Set Material details Material Order Date to
- Set Material Firm Date to
- Set all operation Material Lead Time to
Job Protection Settings
The Job Protection Settings tab enables you to perform mass changes on all of the selected jobs to reset the Job Security Protection. The screen below is an example of the Job Protection Settings tab:
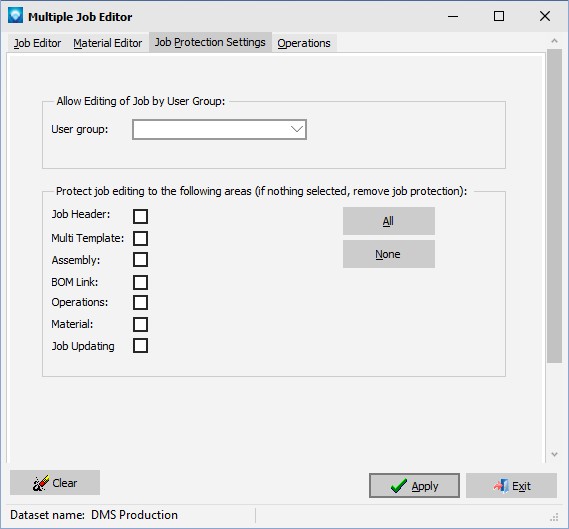
The following prompts are available:
- User Group You can enter a user group who can access the job or leave this field blank if only the user who set the job protection can access the job protection settings and the protected areas of the job.
- Select Job Header to protect all the information on the Job tab from being edited.
- Select Multi Template to protect all the information on the Job Multi Template tab from being edited.
- Select Assembly to protect all the information on the Assembly tab from being edited.
- Select BOM Link to protect all the information on the BOM Link tab from being edited.
- Select Operations to protect all the information on the Operations tab from being edited.
- Select Material to protect all the information on the Material Details tab from being edited.
- Select Job Updating to protect all the job from being updated by Job Status Updating, Quick Job Updating, or by Start/Stop Clock Updating.
You can also use the All button to select all areas of the job to be protected, or the None button.
Click the Apply button and verify the run by clicking OK. All jobs selected will have the new job security protection settings.
Operations
The Operations tab enables you to perform mass changes on all of the selected jobs' operations options. The screen below is an example of the Operations tab:
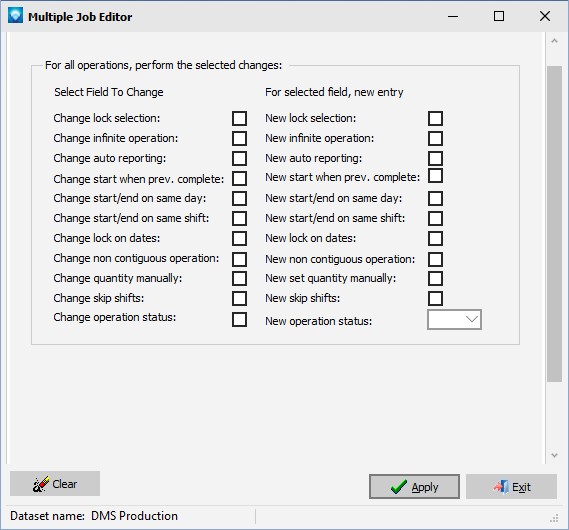
To change the operation options:
- Select the fields to change on the left side of the window.
- Select the new option setting on the right side of the window.
Click the Apply button and verify the run by clicking OK. All jobs' operations options selected will have the new operation options applied.

