Mfg Orders Job Grid
Previous Topic  Next Topic 

Mfg Orders Job Grid is the main screen where you can access other areas of DMS, search for jobs, filter jobs to get a subset of job data, optionally edit the job header, and more.  To access Mfg Orders Job Grid select Manufacturing | Orders.


The screen below is an example of the Manufacturing Orders Job Grid window that is displayed:


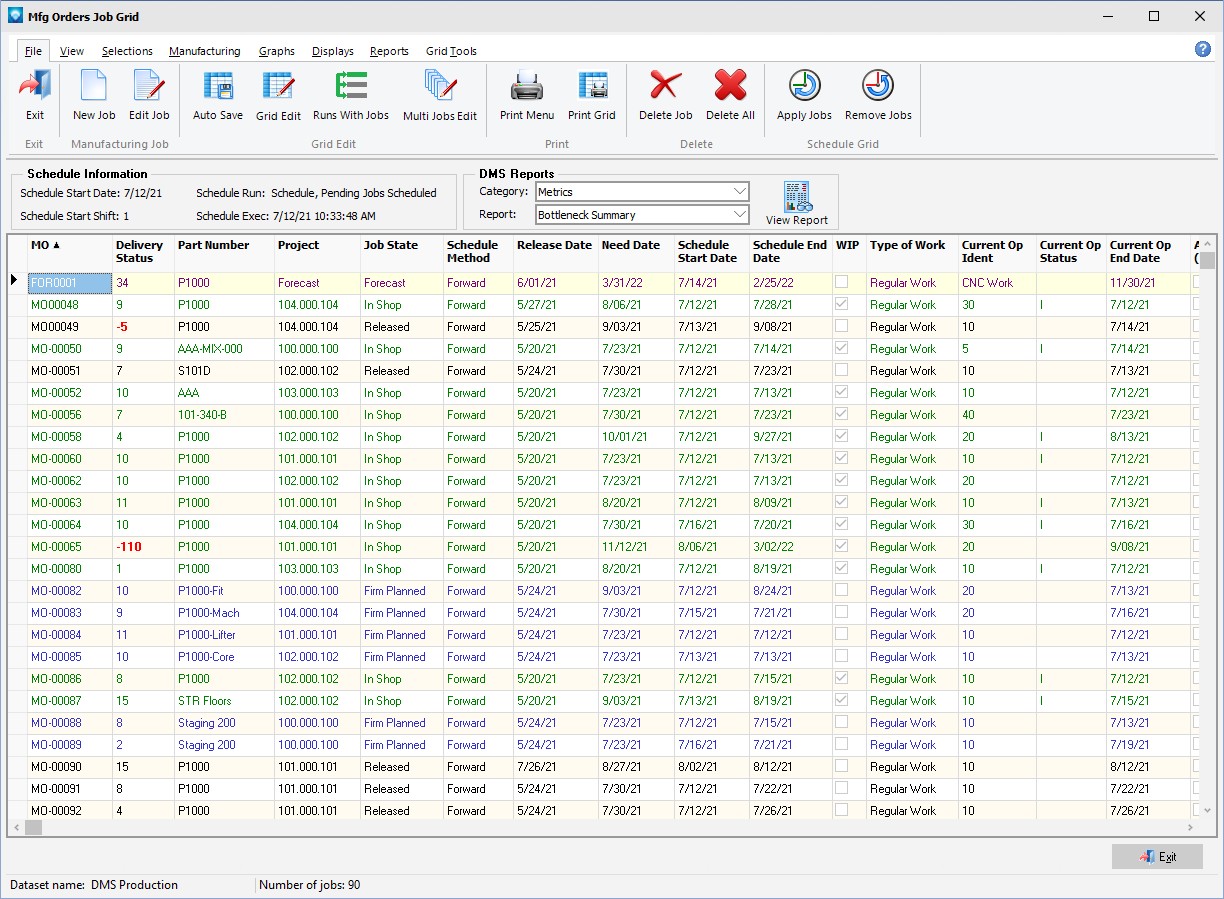
Note that depending on a job's state, the display color of the job can be different.  The display color and job states are defined using Job States.  Above the gird listing of jobs, the schedule start date, schedule start shift, schedule run type and the date the schedule was last executed are displayed.  There is also a DMS Reports group box where you can select a report to be printed or displayed.  You can also use the Reports tab to View and print reports.


From the Manufacturing Orders Job Grid window, the following menu tabs are available:


File


  1. New Job  Add a new job using Manufacturing Order Job Details
  2. Edit Job  Edit the selected job using Manufacturing Order Job Details
  3. Auto Save  Toggle this button on or off.  When editing the Job row in the Job Grid, if this button is on, the job will automatically be saved when you move to a new row.  If off, DMS will ask you if you want to save chnages when you move to a new row.
  4. Grid Edit  Grid Edit enables you to edit job information that is displayed in the Manufacturing Orders job grid.  Not all fields displayed in the grid can be edited such as for Job Notes, operation information, and job user fields; these fields must be editing in Manufacturing Order Job Details.  You also cannot edit a job that does not have any operations.  If a job does not have any operations, Manufacturing Order Job Details must be used to edit the job.
  5. Runs With Jobs Two or more jobs can be selected to be a Runs With Job Group.  To setup a runs with job group, select a job or one or more jobs in the Mfg Orders Job Grid by optionally using selecting multiple rows and select either File | Runs With Jobs or right click on the grid and select Runs With Jobs. 
  6. Multi Jobs Edit  This command enables you to make global changes to two or more jobs.  All of the jobs currently in the job grid are changed.
  7. Print Menu Displays a menu of reports as set by Module Report Settings.
  8. Print Grid  Enables you to print the job grid.
  9. Delete Job  The Delete command will delete the current highlighted job in the Job Grid.
  10. Delete All Jobs  The Delete All command will delete all of the jobs currently in the Job Grid.  Caution should be exercised when using this command as once all the jobs are deleted, they cannot be recovered without the user of an external backup.  Before using the Delete All command, select a subset of jobs to delete with certain attributes using Manufacturing Orders Searching and Filtering.  If you want to delete all the jobs, operations, and job status information, use the Clear Selected Tables command as it is much faster than trying to delete all of the jobs using the Delete All command.
  11. Apply Jobs Apply jobs will schedule all the jobs listed in the job grid onto the existing schedule.
  12. Remove Jobs  Remove jobs will remove all the jobs listed in the job grid from the existing schedule.


View

  1. Job Grid Columns  Select the jobs columns you want to see in the Job Grid.
  2. Display My Grid Displays your default grid.  The Display My Grid can be used to restore your  grid to the default view after performing a saved search which may change the display columns of the grid.
  3. Show Notes  Toggle this button on or off.  When on, if the Job Notes has than one line, the multiple lines of the notes will be displayed.  If off, only this first line of the Job Notes will be displayed. 
  4. Search Footer  Toggle this button on or off.  When on, a prompt will appear at the bottom left side of the grid enabling you to search the gird for the entered text.  If off, the search footer prompt does not appear.
  5. Default menu tab enables you to set the menu tab that will appear when you open Mfg Orders Job Grid.


Selections

  1. Jobs  Job Selections enables you to select jobs based on the job header information.
  2. Dates  Date selection enables you to select jobs by job dates.
  3. User Fields  Select jobs by user defined fields.
  4. Resources  Select jobs by resources, pools and/or departments used by the job.
  5. Assemblies  Assembly Selections enables you to search for jobs that are part of a given assembly and/or have certain assembly attributes. 
  6. Operations  Operation Selections enables you to select jobs based on the operation information.
  7. Clear Selections  To clear your current search criteria, click on the Clear Selections button.  DMS will confirm the clearing of selections
  8. Search  Click on Search to perform the job search.
  9. Load Search  You can recall a previously saved SQL search by clicking on the Load Search.
  10. Save Search  After you have entered search criteria, you have the option of saving the resulting SQL commands enabling you to later recall and perform the same search.
  11. Set Default  enables you to specify a default saved search to run when the user first enters into Mfg Orders Job Grid.
  12. Sort by Group enables you to specify up to three columns to sort the Job Grid by.
  13. Select Rows  Toggle this button on or off to manually select rows (jobs) in the Job Grid.
  14. Keep Selected  To keep the selected rows in the Job Grid.
  15. Remove Selected  To remove the selected rows in the Job Grid.


Manufacturing

  1. New Job  Add a new job using Manufacturing Order Job Details
  2. Edit Job  Edit the selected job using Manufacturing Order Job Details
  3. Calendar/Capacity Changes are changes you want to make to the manufacturing calendar such as holidays, planned overtime, planned shut downs, etc.
  4. Resources  is used to add, edit, delete resource settings.
  5. Schedule Run  Run a global schedule.
  6. Job Updating  is used to manually enter detailed time updates to a job.
  7. Start/Stop Clock  The Start/Stop Clock Updating is an alternate method to to update a job with times and quantities typically used by a timekeeper or shop floor personnel.
  8. Start/Stop Clock Edit  If using Start/Stop Clock Updating, the Edit Start/Stop Clock Job Updating enables an authorized user to edit existing start/stop clock entries. 
  9. Quick Updating  Quick Job Updating is a fast way to update a job with times and quantities without all the displayed details used in Job Updating.


Graphs


Displays


Reports


Grid Tools 


A right click on the Job Grid will display the following popup menu.
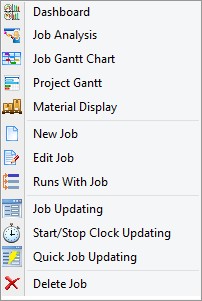


Valid commands are:


  1. Dashboard  To display the dashboard.
  2. Job Analysis  To display the Job Analysis Graph.
  3. Job Gantt Chart  To display the current selected job in the Gantt chart.
  4. Project Gantt  To display all the jobs that are in the current job's Project (job identification).
  5. Material Display  To display the material for the current selected job.
  6. New Job  Add a new job using Manufacturing Order Job Details
  7. Edit Job  Edit the selected job using Manufacturing Order Job Details
  8. Runs With Jobs Two or more jobs can be selected to be a Runs With Job Group.  To setup a runs with job group, select a job or one or more jobs in the Mfg Orders Job Grid by optionally using selecting multiple rows and select either File | Runs With Jobs or right click on the grid and select Runs With Jobs. 
  9. Job Updating  is used to manually enter detailed time updates to the current job.
  10. Start/Stop Clock  The Start/Stop Clock Updating is an alternate method to to update the current job with times and quantities typically used by a timekeeper or shop floor personnel.
  11. Quick Updating  Quick Job Updating is a fast way to update the current job with times and quantities without all the displayed details used in Job Updating.
  12. Delete Job  To delete the current selected job.